Understanding and Implementing Chain of Responsibility Pattern in C#
Rahul Singh
Principal Engineering Manager | Microsoft MVP | CodeProject MVP | Author | Udemy Instructor
Introduction
This article discusses the Chain of Responsibility design pattern. We will explore scenarios where this pattern is beneficial, its advantages, and provide a basic implementation in C#.
Background
In the Observer pattern, one class observes the state changes of another class. Observing classes register themselves to receive notifications when state changes occur, allowing them to act accordingly.
Building upon this concept, imagine the observing class takes actions based on certain conditions. If the condition isn’t met, it forwards the event to another object in line. In this case, a sequence of objects works together, where each object decides to either handle the request or pass it along the chain.
The Chain of Responsibility pattern is perfect for such scenarios. Here, an object listens for an event, handles it if possible, or delegates it to the next object. This pattern is particularly useful for implementing workflows.
The Gang of Four (GoF) defines this pattern as: "Avoid coupling the sender of a request to its receiver by giving more than one object a chance to handle the request. Chain the receiving objects and pass the request along the chain until an object handles it."
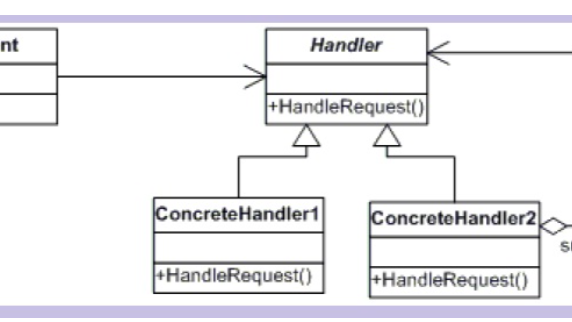
Class Diagram Overview
To understand the Chain of Responsibility, let’s examine its components:
Using the Code
To illustrate the pattern, let’s build a workflow for leave approvals in an organization:
We’ll implement the pattern with the following:
Abstract Handler: Employee
The Employee class is responsible for:
Here’s the implementation:
public abstract class Employee
{
    // Every employee will have a supervisor
    protected Employee supervisor;

    // Event mechanism to handle leave applications
    public delegate void OnLeaveApplied(Employee e, Leave l);
    public event OnLeaveApplied onLeaveApplied;

    public void LeaveApplied(Employee sender, Leave leave)
    {
        onLeaveApplied?.Invoke(this, leave);
    }

    public abstract void ApproveLeave(Leave leave);

    public Employee Supervisor
    {
        get => supervisor;
        set => supervisor = value;
    }

    public void ApplyLeave(Leave leave)
    {
        LeaveApplied(this, leave);
    }
}
Concrete Handlers
Team Leader
The TeamLeader class approves leaves under 10 days or forwards them to the next handler:
public class TeamLeader : Employee
{
    const int MAX_LEAVES_CAN_APPROVE = 10;

    public TeamLeader()
    {
        this.onLeaveApplied += TeamLeader_onLeaveApplied;
    }

    void TeamLeader_onLeaveApplied(Employee sender, Leave leave)
    {
        if (leave.NumberOfDays <= MAX_LEAVES_CAN_APPROVE)
        {
            ApproveLeave(leave);
        }
        else
        {
            Supervisor?.LeaveApplied(this, leave);
        }
    }

    public override void ApproveLeave(Leave leave)
    {
        Console.WriteLine($"LeaveID: {leave.LeaveID}, Days: {leave.NumberOfDays}, Approver: Team Leader");
    }
}
Project Leader
The ProjectLeader handles leaves under 20 days and forwards others:
public class ProjectLeader : Employee
{
    const int MAX_LEAVES_CAN_APPROVE = 20;

    public ProjectLeader()
    {
        this.onLeaveApplied += ProjectLeader_onLeaveApplied;
    }

    void ProjectLeader_onLeaveApplied(Employee sender, Leave leave)
    {
        if (leave.NumberOfDays <= MAX_LEAVES_CAN_APPROVE)
        {
            ApproveLeave(leave);
        }
        else
        {
            Supervisor?.LeaveApplied(this, leave);
        }
    }

    public override void ApproveLeave(Leave leave)
    {
        Console.WriteLine($"LeaveID: {leave.LeaveID}, Days: {leave.NumberOfDays}, Approver: Project Leader");
    }
}
HR
The HR class handles leaves up to 30 days and notifies users for manual approvals if needed:
public class HR : Employee
{
    const int MAX_LEAVES_CAN_APPROVE = 30;

    public HR()
    {
        this.onLeaveApplied += HR_onLeaveApplied;
    }

    void HR_onLeaveApplied(Employee sender, Leave leave)
    {
        if (leave.NumberOfDays <= MAX_LEAVES_CAN_APPROVE)
        {
            ApproveLeave(leave);
        }
        else
        {
            Console.WriteLine("Leave application suspended, please contact HR.");
        }
    }

    public override void ApproveLeave(Leave leave)
    {
        Console.WriteLine($"LeaveID: {leave.LeaveID}, Days: {leave.NumberOfDays}, Approver: HR");
    }
}
Leave Class
Encapsulates leave details for processing:
public class Leave
{
    public Leave(Guid id, int days)
    {
        LeaveID = id;
        NumberOfDays = days;
    }

    public Guid LeaveID { get; set; }
    public int NumberOfDays { get; set; }
}
Client Code
Finally, the Program class creates the chain and initiates requests:
class Program
{
    static void Main(string[] args)
    {
        TeamLeader tl = new TeamLeader();
        ProjectLeader pl = new ProjectLeader();
        HR hr = new HR();

        tl.Supervisor = pl;
        pl.Supervisor = hr;

        Leave leaveRequest = new Leave(Guid.NewGuid(), 25);
        tl.ApplyLeave(leaveRequest);
    }
}
So we can see that this Main function is creating the chain by setting the successors for each class and is initiating the request to TeamLeader class. One request for each scenario has been made. When we run this application.
So we can see that each request get passed on and processed by the respective class based on the number of days applied for. Before wrapping up let us look at the class diagram for our application and compare it with the original GoF diagram.?
Conclusion
The Chain of Responsibility pattern decouples the sender and receiver, enabling multiple objects to handle requests in a defined sequence. It’s particularly useful for workflows and approval systems.
Try this pattern in your next project and share your experience!
#DesignPatterns #CSharpDevelopment #ChainOfResponsibility #SoftwareArchitecture