Springdoc OpenAPI with Spring Cloud Gateway
Young Gyu Kim
Solution Architect, Senior Java developer, Observability Engineer, Big Data Engineer, Flutter developer, Kubernetes application developer
Introduction
This article is a part of a series of articles on Springdoc OpenAPI and Spring Cloud Gateway.
To understand this article, you should have a basic understanding of Spring Boot, Spring Security, and OAuth2. If you are new to Spring Boot, Spring Security, and OAuth2, you can refer to the following article and its series:
Topics that we will cover in this article:
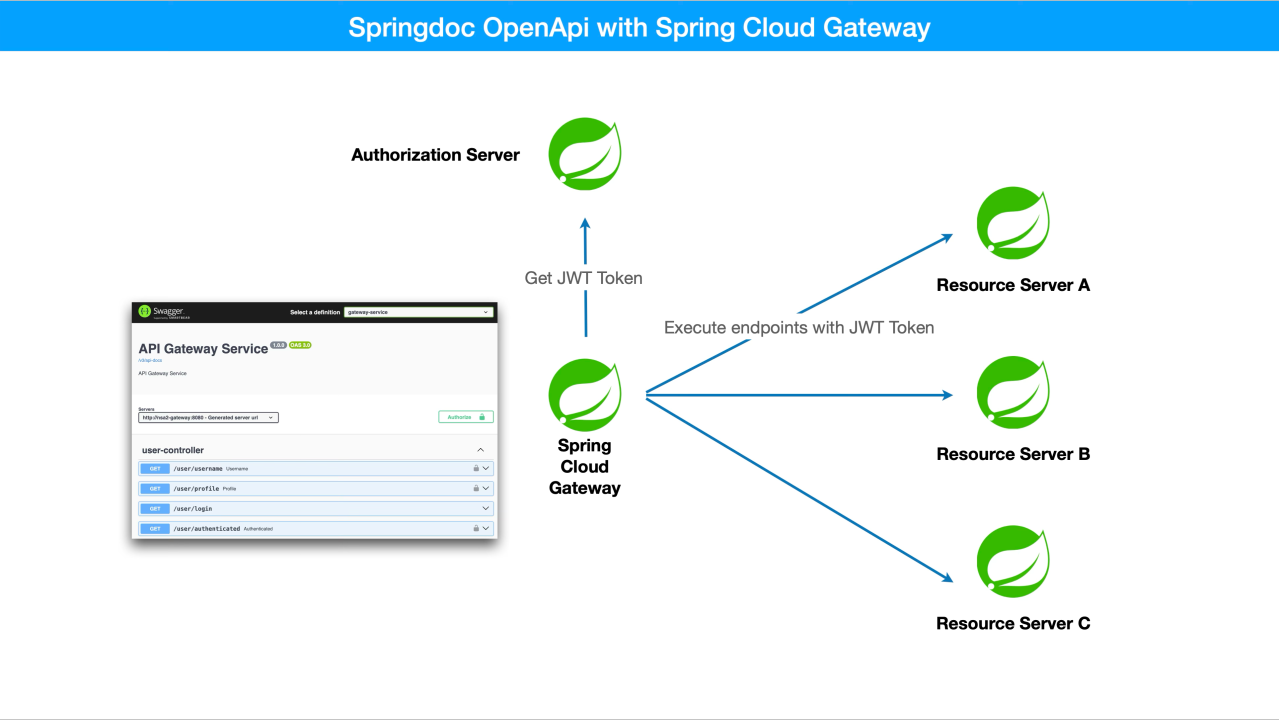
Benefits of using Springdoc OpenAPI with Spring Cloud Gateway
CORS Configuration
CORS errors happen when a web application tries to make a request to a different domain in a web browser. CORS (Cross-Origin Resource Sharing) is a security feature that limits the resources a web page can access from other domains.
For more information about CORS, you can refer to the following article:
When making requests from the Swagger UI on Spring Cloud Gateway to the Resource Servers, we need to configure CORS on the Resource Servers to allow requests from the Gateway. Additionally, we must enable CORS on the Authorization Server to permit requests from the Gateway for the OAuth2 authorization code flow. However, there’s no need to configure CORS on the Authorization Server for the Resource Servers, as the Gateway will handle CORS for them.
Add Springdoc OpenAPI to Spring Cloud Gateway
To enable Springdoc OpenAPI in a Spring Boot application, we need to edit files below:
build.gradle.kts
In this example, I’m using an MVC-based Spring Cloud Gateway with Virtual Threads. Therefore, I need to add the springdoc-openapi-starter-webmvc-ui dependency to the build.gradle.kts file.
build.gradle.kts of Spring Cloud Gateway
plugins {
    java
    id("org.springframework.boot") version "3.4.1"
    id("io.spring.dependency-management") version "1.1.7"
    id("org.graalvm.buildtools.native") version "0.10.4"
}

dependencies {
    // omit other dependencies

    // Spring Cloud Gateway MVC
    // (1)
    implementation("org.springframework.cloud:spring-cloud-starter-gateway-mvc")

    // Springdoc OpenAPI
    // (2)
    implementation("org.springdoc:springdoc-openapi-starter-webmvc-ui:2.7.0")
}
If you’re using a Reactive Gateway, you’ll need to include the following dependency:
dependencies {
    // omit other dependencies

    // Spring Cloud Gateway WebFlux
    implementation("org.springframework.cloud:spring-cloud-starter-gateway")

    // Springdoc OpenAPI
    implementation("org.springdoc:springdoc-openapi-starter-webflux-ui:2.7.0")
}
application.yaml of Spring Cloud Gateway
application.yaml of Spring Cloud Gateway
spring:
  cloud:
    gateway:
      mvc:
        enabled: true

        # (1)
        routes:
          - id: resource-server
            uri: ${NSA2_RESOURCE_SERVER_URI:https://nsa2-resource-server-example:8082}
            predicates:
              - Path=/resource-server/**
            filters:
              - StripPrefix=1
              - AddRequestHeader=Origin, https://nsa2-gateway:8080
              - TokenRelay=

springdoc:
  cache:
    disabled: true
  api-docs:
    enabled: true
#    path: /v3/api-docs
  oAuthFlow:
    authorizationUrl: ${NSA2_OAUTH_AUTHORIZATION_URL:https://nsa2-auth-server:9000/oauth2/authorize}
    tokenUrl: ${NSA2_OAUTH_TOKEN_URL:https://nsa2-auth-server:9000/oauth2/token}
  swagger-ui:
    oauth:
      client-id: ${NSA2_OAUTH_CLIENT_ID:nsa2}
      client-secret: ${NSA2_OAUTH_CLIENT_SECRET:secret}
    enabled: true
    path: /swagger-ui.html
    config-url: /v3/api-docs/swagger-config
    # Add the following line to enable the Swagger UI to work with OAuth2
    # (2)
    urls:
      - name: gateway-service
        url: /v3/api-docs
      - name: resource-server
        url: /resource-server/v3/api-docs
The configuration above enables Springdoc OpenAPI in Spring Cloud Gateway which is almost the same with the one that we used in the previous article. The only difference is that we added the urls configuration to the swagger-ui configuration. This configuration is required to make the Swagger UI work with OAuth2. In this example, we have two services: gateway-service and resource-server. We need to define the URL path of the OpenAPI (Swagger) documentation for each service.
OpenAPIConfig.java
OpenAPIConfig.java file is used to set up @OpenAPIDefinition and @SecuritySchemes.
OpenAPIConfig.java of Spring Cloud Gateway
@OpenAPIDefinition(
        info = @io.swagger.v3.oas.annotations.info.Info(
                title = "API Gateway Service",
                version = "1.0.0",
                description = "API Gateway Service"
        )
)
@SecuritySchemes({
    @SecurityScheme(
        name="security-auth",
        type= SecuritySchemeType.OAUTH2,
        flows= @OAuthFlows(
            authorizationCode = @OAuthFlow(
                authorizationUrl = "${springdoc.oAuthFlow.authorizationUrl}",
                tokenUrl = "${springdoc.oAuthFlow.tokenUrl}",
                scopes = {
                    @OAuthScope(name = "openid", description = "OpenID"),
                    @OAuthScope(name = "profile", description = "Profile")
                }
            )
        )
    ),
    @SecurityScheme(
        name="bearer-key",
        type = SecuritySchemeType.HTTP,
        scheme = "bearer",
        bearerFormat = "JWT"
    )
})
public class OpenAPIConfig {
}
SecurityConfig.java files for CORS Configuration
In Spring Security, CORS configuration can be done by extending the WebMvcConfigurer class and overriding the addCorsMappings(CorsRegistry registry) method. But, in this example, we will use the WebSecurityConfigurerAdapter class to set up CORS configuration.
SecurityConfig.java of Authorization Server
@Configuration(proxyBeanMethods = false)
@EnableWebSecurity
@Slf4j
public class SecurityConfig {
    private static final List<String> ALLOWED_HEADERS =
            List.of("*");
    private static final List<String> ALLOWED_METHODS =
            List.of("POST", "GET", "PUT", "OPTIONS", "DELETE", "PATCH");

    // (1)
    private static final List<String> ALLOWED_ALL =
            List.of("https://nsa2-gateway:8080", "https://127.0.0.1:8080");

    private static String[] allowedUris = new String[] {
                "/error",
                "/actuator/health",
                "/actuator/health/liveness",
                "/actuator/health/readiness",
                "/.well-known/**"
        };

    @Bean
    CorsConfigurationSource corsConfigurationSource() {
        CorsConfiguration configuration = new CorsConfiguration();

        configuration.setAllowedOrigins(ALLOWED_ALL);
        configuration.setAllowedMethods(ALLOWED_METHODS);
        configuration.setAllowedHeaders(ALLOWED_HEADERS);
        configuration.setAllowCredentials(true);
        configuration.setMaxAge(3600L);

        UrlBasedCorsConfigurationSource source = new UrlBasedCorsConfigurationSource();
        source.registerCorsConfiguration("/**", configuration);
        return source;
    }


    @Bean
    SecurityFilterChain securityFilterChain(
            HttpSecurity http,
            CorsConfigurationSource corsConfigurationSource) throws Exception {

        return http
                // (2)
                .cors(cors -> cors.configurationSource(corsConfigurationSource))
                .authorizeHttpRequests(authorizeRequests ->
                        authorizeRequests.requestMatchers(allowedUris).permitAll()
                                .anyRequest().authenticated()
                )
                .formLogin(Customizer.withDefaults())
                .build();
    }

    // omit other configurations
}
As for CORS configuration, we need to configure the Resource Server as well. The configuration is almost the same as the Authorization Server.
SecurityConfig.java of Resource Server
@Configuration(proxyBeanMethods = false)
@EnableWebSecurity
public class OAuth2ResourceServerConfig {
    private static final List<String> ALLOWED_HEADERS =
                List.of("*");
    private static final List<String> ALLOWED_METHODS =
            List.of("POST", "GET", "PUT", "OPTIONS", "DELETE", "PATCH");
    (1)
    private static final List<String> ALLOWED_ALL =
            List.of("https://nsa2-gateway:8080", "https://127.0.0.1:8080");


    private static final String[] ALLOWED_URIS = {
            "/actuator/health",
            "/actuator/health/liveness",
            "/actuator/health/readiness",
            "/openapi/**",
            "/swagger-ui/**",
            "/swagger-ui.html",
            "/webjars/**",
            "/v3/api-docs/**",
    };
    @Bean
    CorsConfigurationSource corsConfigurationSource() {
        CorsConfiguration configuration = new CorsConfiguration();

        configuration.setAllowedOrigins(ALLOWED_ALL);
        configuration.setAllowedMethods(ALLOWED_METHODS);
        configuration.setAllowedHeaders(ALLOWED_HEADERS);
        configuration.setAllowCredentials(true);
        configuration.setMaxAge(3600L);

        UrlBasedCorsConfigurationSource source = new UrlBasedCorsConfigurationSource();
        source.registerCorsConfiguration("/**", configuration);
        return source;
    }
    @Bean
    @Order(Ordered.HIGHEST_PRECEDENCE)
    public SecurityFilterChain resourceServerSecurityFilterChain(
            HttpSecurity http,
            CorsConfigurationSource corsConfigurationSource,
            JwtAuthenticationConverter nsa2AuthenticationConverter) throws Exception {

        http
            //.cors(Customizer.withDefaults())
            // (2)
            .cors(cors -> {
                cors.configurationSource(corsConfigurationSource);
            })
            .authorizeHttpRequests(authorize ->
                    authorize
                            .requestMatchers(ALLOWED_URIS).permitAll()
                            .anyRequest().authenticated()
            )
            .oauth2ResourceServer(oauth2ResourceServer ->
                    oauth2ResourceServer.jwt(jwt -> {
                        jwt.jwtAuthenticationConverter(nsa2AuthenticationConverter);
                    })
            );

        return http.build();
    }

    // omit other configurations
}
Update oauth2_registered_client table to Add redirect_uri
Now that we aggregated the OpenAPI (Swagger) documentation into Spring Cloud Gateway, we can access the Swagger UI from the Gateway. So the authentication process will be done through the Gateway. So, we don’t need to add redirect urls for the Resource Servers. But, we need to add the redirect_uri for the Gateway to the oauth2_registered_client table.
And make sure to add the 'client_secret_post' to the client_authentication_methods column.
Here is the SQL query to update the oauth2_registered_client table:
UPDATE oauth2_registered_client
SET redirect_uri = 'https://nsa2-gateway:8080/login/oauth2/code/nsa2,https://nsa2-gateway:8080/swagger-ui/oauth2-redirect.htmll',
    client_authentication_methods='client_secret_basic,client_secret_post'
WHERE client_id = 'nsa2';
领英推荐
Try it out with Swagger UI
Navigate to the Swagger UI URL of the Gateway service. In this example, the URL is https://nsa2-gateway:8080/swagger-ui.html.
Aggregated OpenAPI (Swagger) Documentation
For all the API endpoints of the resource servers(microserices) that are registered in the Gateway, you can see the OpenAPI (Swagger) documentation in the Swagger UI.
Figure 1. Aggregated OpenAPI Documentation in Swagger UI of Gateway
For demonstration purposes, I added OpenAPI documentation for the Gateway service as well. Unlike resource servers, the Gateway services do not use Bearer tokens for authentication. Instead, they use Session Cookies for authentication suggested by BFF (Backend for Frontend) pattern.
And we can see Gateway uses a different dependencies from resource servers.
build.gradle.kts of Gateway
dependencies {
    implementation("org.springframework.boot:spring-boot-starter-oauth2-client")
    // omit other dependencies
}
build.gradle.kts of Resource Server
dependencies {
    implementation("org.springframework.boot:spring-boot-starter-oauth2-resource-server")
    // omit other dependencies
}
Execute Endpoints of the Resource Servers
As we could see in the previous article, we need to authenticate with the Authorization Server first. And then we can execute the endpoints of the Resource Servers.
Figure 2. Aggregated Resource Server Call in Swagger UI of Gateway
After clicking the lock icon in the top right corner of the Swagger UI, we can authenticate with the Authorization Server. And then we can execute the endpoints of the Resource Servers.
Once you click 'Execute' button, you will see the JWT token in curl command. And you can see the response of the endpoint.
And we can as many resource servers as we want in the Gateway service. They will work the same way as the above example.
Execute Endpoints of the Gateway Service
Unlike the Resource Servers, the Gateway service uses Session Cookies for authentication. So, we can get a different result if we try it in the same way as the Resource Servers.
Let’s see what happens when we try to execute the endpoints of the Gateway service.
Figure 3. Aggregated Gateway Service Call in Swagger UI of Gateway
After clicking the lock icon in the top right corner of the Swagger UI, we can authenticate with the Authorization Server. And then we can execute the endpoints of the Gateway service.
When we click the 'Execute' button, we will see the JWT token in the curl command. However, this time it will return HTML page as its response which is the login page of the Authorization Server. This is because the Gateway service uses Session Cookies for authentication, but we don’t have a session yet.
The simple way to resolve this issue is to call any endpoint of the Gateway service in the browser. Then, the page will be redirected to the login page of the Authorization Server. After logging in, we can get the response of the endpoint on the web browser with the Session Cookies as response headers.
Let’s see what happens when we try to execute the endpoints of the Gateway service in the browser.
Put the URL of the Gateway service in the address bar of your browser. In this example, the URL is https://nsa2-gateway:8080/hello.
Because we don’t have a session yet, the page will be redirected to the login page of the Authorization Server.
Figure 4. Redirected to the Login Page of the Authorization Server
After logging in, we can see the response of the endpoint on the web browser with the Session Cookies as response headers.
Figure 5. Get Response with Session Cookies
In the same web browser, when we open the Swagger UI of the Gateway service, we can execute the endpoints of the Gateway service without any issues.
Figure 6. Gateway Service Call with Session
We can see that there is no JWT token in the curl command. But, the response is the same as the one we got in the web browser.
Conclusion
In this article, we have seen how to aggregate OpenAPI (Swagger) documentation into Spring Cloud Gateway using Springdoc OpenAPI. We have also seen how to configure CORS on the Authorization Server and Resource Server. We have updated the oauth2_registered_client table to add the redirect_uri for the Gateway. And we have tried out the Swagger UI with JWT tokens.
All my LinkedIn articles are available at All My LinkedIn Articles.