Securing Enterprise Access in Real Time: Using Continuous Access Evaluation
Chandan Bilvaraj
Engineer Digital Innovator | Embracing the Future of Technology with Creativity and Curiosity | Driving Change in the Tech World
Introduction
Standard industry practice involves token expiration and refresh. Client applications use OAuth 2.0 access tokens for API authorization, typically valid for one hour, requiring refresh via Microsoft Entra ID. This refresh allows user access policy re-evaluation, potentially denying access due to Conditional Access policies or disabled accounts.
Customers have expressed concern about delays in policy enforcement following user condition changes. Shortening token lifetimes proved ineffective, harming user experience and reliability without solving the problem.
Real-time communication between Microsoft Entra ID (the token issuer) and the application (the relying party) is crucial for addressing policy violations. Microsoft Entra ID's Continuous Access Evaluation (CAE) addresses this by enabling near-instantaneous security policy enforcement. With CAE, services like Exchange Online, SharePoint Online, and Teams subscribe to critical events, ensuring continuous and prompt access decision evaluation and enforcement.
Key Benefits of CAE
Scenarios for Continuous Access Evaluation (CAE)
User Account Disabled or Deleted
User Password Change or Reset
Suspicious Sign-In Detected
Network Location Changes
High-Risk User or Device Detected
Exported Token Misuse Prevention
License Requirement:
To leverage the full capabilities of Continuous Access Evaluation (CAE), organizations must have an appropriate Microsoft Entra ID licensing plan. Specifically, Azure AD Premium P1 or P2 licenses are required to enable advanced security features and customization options for CAE.
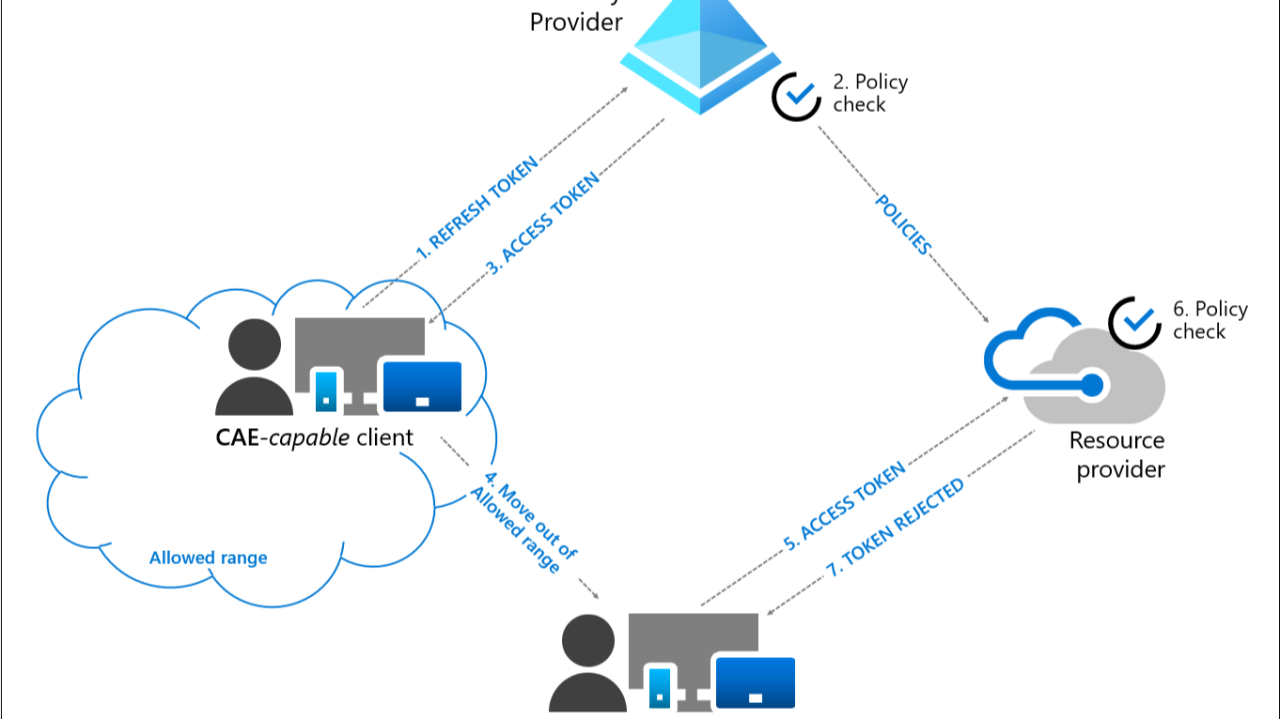
Workflow of Continuous Access Evaluation (CAE)
Continuous Access Evaluation (CAE) enables real-time enforcement of security policies by continuously assessing access conditions for user sessions. Here's a concise overview of the workflow:
Enabling Continuous Access Evaluation in Entra ID
Continuous Access Evaluation (CAE) settings are now managed within Conditional Access. New CAE users can directly enable or disable CAE when configuring Conditional Access policies. Some existing users, however, may need to complete a migration process before accessing CAE through Conditional Access.
Step 1: Access the Microsoft Entra Admin Center: Sign in to the Microsoft Entra admin center with appropriate administrative privileges.
Step 2: Navigate to Conditional Access Policies: In the left-hand navigation pane, select Conditional Access under Protection section:
Step 3: Create or Modify a Conditional Access Policy: To create a new policy, click on New policy. To modify an existing policy, select the policy from the list.
Step 4: Configure the Policy:
Step 5: Enable or Disable Continuous Access Evaluation
领英推荐
Step 6: Save & Enable Policy
Note: If you previously configured CAE settings under the Security section, you might need to migrate these settings to a new Conditional Access policy. The migration experience varies based on your prior configurations. For detailed information, refer to the Continuous Access Evaluation documentation.
Technical Overview: CAE Revocation Mechanism
Implementation: Setting Up CAE in your Application Stack
Setting up CAE in your application stack involves configuring Microsoft Entra ID (Azure AD) to issue CAE-enabled tokens, implementing token validation in your application (e.g., Python FastAPI), and leveraging Conditional Access policies to enforce security requirements.
By integrating CAE, your application enhances security, minimizes risks, and maintains compliance with modern access control standards.
Prerequisites
Configure Your Application in Microsoft Entra ID
CAE Enabled Client: Enabling CAE IN React Web Application
Step 1: Install MSAL Packages
npm install @azure/msal-browser @azure/msal-react
Step 2: Initialize MSAL in React Application:
Create an authConfig.js file to define your MSAL configuration:
// authConfig.js
import { PublicClientApplication } from '@azure/msal-browser';

const msalConfig = {
  auth: {
    clientId: '<CLIENT_ID>',
    authority: 'https://login.microsoftonline.com/<TENANT_ID>',
    redirectUri: '<REDIRECT_URL>',
  },
  cache: {
    cacheLocation: 'localStorage',
    storeAuthStateInCookie: false,
  },
};

export const msalInstance = new PublicClientApplication(msalConfig);
Step 3: Wrap Your Application with MSAL Provider
In your index.js or main application file, wrap your app with the MsalProvider to provide MSAL context to your components:
import React from 'react';
import ReactDOM from 'react-dom';
import App from './App';
import { MsalProvider } from '@azure/msal-react';
import { msalInstance } from './authConfig';

ReactDOM.render(
  <MsalProvider instance={msalInstance}>
    <App />
  </MsalProvider>,
  document.getElementById('root')
);
Step 4: Enable Continuous Access Evaluation (CAE):
To leverage CAE, your application must indicate its capability to handle CAE events by including the xms_cc claim with a value of cp1 in its access tokens. This is achieved by specifying the clientCapabilities parameter during the authentication request.
import React from 'react';
import msalInstance from './authConfig'

const UserAuthLogin = () => {
  const loginRequest = {
    scopes: ['User.Read'],
    extraQueryParameters: {
      clientCapabilities: JSON.stringify(['cp1']),
    },
  };

  const handleLogin = async () => {
    try {
      const response = await msalInstance.loginPopup(loginRequest);
      console.log('Login successful!', response);
    } catch (error) {
      console.error('Login failed!', error);
    }
  };

  return (
    <div style={{ textAlign: 'center', marginTop: '50px' }}>
      <h1>Login with Microsoft</h1>
      <button
        onClick={handleLogin}
        style={{
          padding: '10px 20px',
          fontSize: '16px',
          backgroundColor: '#0078d4',
          color: '#fff',
          border: 'none',
          borderRadius: '5px',
          cursor: 'pointer',
        }}
      >
        Login with Microsoft
      </button>
    </div>
  );
};

export default UserAuthLogin;
Setting Up Continuous Access Evaluation (CAE) in a Python FastAPI Application
Step 1: Install the Required Libraries
pip install fastapi uvicorn python-jose msal
Step 2: Setup the Token Validator Middleware:
from fastapi import Request, HTTPException
from jose import jwt
from jose.exceptions import JWTError
import requests

class TokenValidator:
    def __init__(self, tenant_id: str, client_id: str, audience: str):
        self.tenant_id = tenant_id
        self.client_id = client_id
        self.audience = audience
        self.authority = f"https://login.microsoftonline.com/{tenant_id}"
        self.jwks_uri = f"https://login.microsoftonline.com/{tenant_id}/discovery/v2.0/keys"
        self.jwks = requests.get(self.jwks_uri).json()

    async def __call__(self, request: Request):
        authorization = request.headers.get("Authorization")
        if not authorization or not authorization.startswith("Bearer "):
            raise HTTPException(status_code=401, detail="Authorization header missing or invalid")

        access_token = authorization.split(" ")[1]
        try:
            payload = jwt.decode(
                access_token,
                self.jwks,
                audience=self.audience,
                issuer=f"{self.authority}/v2.0",
                options={"verify_aud": True, "verify_iss": True}
            )
        except JWTError:
            raise HTTPException(
                status_code=401,
                detail="Invalid token",
                headers={"WWW-Authenticate": f'Bearer error="invalid_token"'}
            )

        if self.is_token_revoked(access_token):
            raise HTTPException(
                status_code=401,
                detail="Token revoked",
                headers={"WWW-Authenticate": f'Bearer error="invalid_token", claims="cp1"'}
            )

        request.state.user = payload

    def is_token_revoked(self, access_token: str) -> bool:
        response = requests.get(
            "https://graph.microsoft.com/v1.0/me",
            headers={"Authorization": f"Bearer {access_token}"}
        )
        return response.status_code != 200
Step 3: Use the Middleware in FastAPI application
from fastapi import FastAPI, Depends, Request
from middlewares import TokenValidator

app = FastAPI()

token_validator = TokenValidator(
    tenant_id="your_tenant_id",
    client_id="your_client_id",
    audience="api://your_api_scope",
)


# (no authentication required)
@app.get("/ping")
async def ping():
    return {"message": "Application is running"}


# protected route (authentication required)
@app.get("/controlplane/manage", dependencies=[Depends(token_validator)])
async def secure_data(request: Request):
    # access user information added by the TokenValidator
    user_info = request.state.user
    return {
        "message": "This is protected data",

    }
Summary
By integrating CAE into the enterprise, organizations can ensure robust, real-time access security with minimal impact on user productivity. This dynamic model supports zero-trust principles, enhancing both security and operational efficiency.
By implementing CAE strategically, enterprises can enhance security posture, reduce the risk of unauthorized access, and support Zero Trust principles without compromising productivity. ??