Optimizing AWS Service Performance: A Study with API Gateway, Lambda, and DynamoDB
Alexandre Rolim
Senior Software Engineer | Full stack Developer | Backend Developer | Java Certified, AWS Certified | SpringBoot, AWS, System Design, Microservices, SQL, NoSQL, Docker l Solution Architecture
Serverless and microservices make a powerful combination in cloud environments. However, even with the flexibility of serverless, performance remains a crucial concern. As traffic increases, some optimizations and adjustments are still needed to ensure the system responds efficiently.
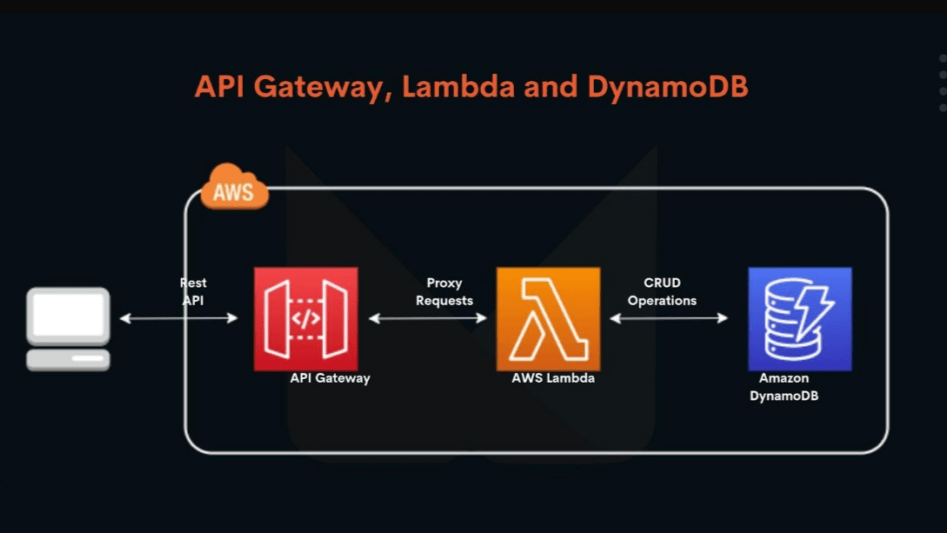
Our goal is to set up a simple infrastructure using some key AWS services like API Gateway, Lambda, and DynamoDB. Then, we'll run performance tests using crud operations to see how the system handles increased traffic and figure out what we can tweak to make everything faster and more efficient.
Setup
Create Lambda IAM Role
First, we'll set up the permissions so our Lambda can run successfully, including access to the DynamoDB that we'll create later on.
The policy below allows the Lambda function to access and manipulate data in DynamoDB and register logs in CloudWatch, ensuring essential operations and complete monitoring.
{
    "Version": "2012-10-17",
    "Statement": [
        {
            "Sid": "Stmt1428341300017",
            "Action": [
                "dynamodb:DeleteItem",
                "dynamodb:GetItem",
                "dynamodb:PutItem",
                "dynamodb:Query",
                "dynamodb:Scan",
                "dynamodb:UpdateItem"
            ],
            "Effect": "Allow",
            "Resource": "*"
        },
        {
            "Sid": "",
            "Resource": "*",
            "Action": [
                "logs:CreateLogGroup",
                "logs:CreateLogStream",
                "logs:PutLogEvents"
            ],
            "Effect": "Allow"
        }
    ]
}
Next, we create our Role and attach it to the policy above.
Create Lambda Function
The next step is to create a simple Lambda function using Python 3.8 for our test, making sure to attach the Role we created in the previous step.
Once the function is created, we'll add the code below, making sure to deploy after making changes.
This code sets up an AWS Lambda function that processes incoming events to perform different actions on a DynamoDB table. Using the boto3 library, it can create, read, update, delete, or list items in the table. It also has some simple test features, like sending back an "echo" or replying with "pong" when you use "ping." The operation to run is picked based on what’s specified in the event.
from __future__ import print_function

import boto3
import json

print('Loading function')


def lambda_handler(event, context):
    '''Provide an event that contains the following keys:

      - operation: one of the operations in the operations dict below
      - tableName: required for operations that interact with DynamoDB
      - payload: a parameter to pass to the operation being performed
    '''
    #print("Received event: " + json.dumps(event, indent=2))

    operation = event['operation']

    if 'tableName' in event:
        dynamo = boto3.resource('dynamodb').Table(event['tableName'])

    operations = {
        'create': lambda x: dynamo.put_item(**x),
        'read': lambda x: dynamo.get_item(**x),
        'update': lambda x: dynamo.update_item(**x),
        'delete': lambda x: dynamo.delete_item(**x),
        'list': lambda x: dynamo.scan(**x),
        'echo': lambda x: x,
        'ping': lambda x: 'pong'
    }

    if operation in operations:
        return operations[operation](event.get('payload'))
    else:
        raise ValueError('Unrecognized operation "{}"'.format(operation))
Now let's test our function.
Create DynamoDB Table
Now let's set up our database using DynamoDB as an example. For our test, we'll create a simple table with only the Id field as the Partition Key.
领英推荐
Create API Gateway
To finish this setup, we'll configure our API Gateway and create our POST method to start our performance test.
After creating the API, we'll set up our resource and finally our POST method, which will call the Lambda function we created.
Now we just need to deploy our API and start testing it.
Performance Test
Now that our setup is ready, let's dive in and simulate some traffic scenarios to see how the Lambda performs. For this, I'll use Postman, a well-known tool for API testing.
Before starting our tests, we'll make some requests to add a few records, which will be important for our test. If your results look similar to the images below, congratulations, your setup is correctly configured. Otherwise, follow the steps above as usual. Note: the request URL is provided by AWS after deploying the API.
Now let's consider the following settings for our first test:
The performance test shows that, with 10 virtual users simulating traffic over 2 minutes, the system handled the load well. A total of 589 requests were sent, averaging 4.61 requests per second. The average response time was 456 ms, which is decent, and the error rate was 0%, meaning there were no failures. Overall, the system maintained stable performance even as the traffic increased.
But could it get even better? Absolutely... An interesting factor about Lambda is that memory and CPU go hand in hand. In this case, to give our Lambda more power, we'll increase the memory a bit, keeping in mind that the default configuration starts with 128 MB.
As you can see in the image below, increasing the memory from 128 MB to 1024 MB made a big difference in performance. The average response time was cut in half, and the Lambda could handle a higher volume of requests.
Conclusion
Increasing the memory of a Lambda function boosts performance, making response times faster and allowing the function to handle more requests. But it also raises costs, since AWS charges based on memory and execution time. The trade-off is finding the right balance: using more memory when needed to keep things efficient, but saving on costs for simpler tasks. It’s all about testing different setups and finding the best cost-to-performance ratio for your application.