The Meaning, Maths, and Physics of SwiftUI Spring Animation: Amos Gyamfi’s Manifesto
Spring animation provides an excellent way for developers to add elegant and dynamic motion to their apps. This article and its companion repo focus on Spring Animation on iOS using SwiftUI. It serves as a Spring Animation cheat sheet and cookbook for building fine-grained and buttery motion/animations on iOS. However, developers can apply the core concepts to create fluid animations, motion, and transitions for platforms like React, Android, and Flutter.
As your 2025 New Year gift, the Xcode project on GitHub includes many practical examples and use cases illustrating key spring animation concepts and parameters.
Springs Overview
This post outlines my approach to creating fluid and organic animations/motion for chat and audio/video using nothing but springs in SwiftUI. Get inspired by the techniques, tips, tricks, and hidden gems this post unlocks to add beautiful and useful animations to your apps powered by springs.
Spring animation emulates the behavior of an object attached to a physical spring, as shown above, which helps you create an illusion of naturalness and believableness in the human eyes. It mimics the movement of soft objects and their properties in the physical world. Unlike animating with timing curves, springs can cause animations to begin and stop at different times to create smooth and imprecise movements using their initial velocity.
Initial Velocity
The initial velocity of an object attached to a spring is the initial rate of change of a specific parameter you want to animate. Its purpose is to manage the spring animation’s starting speed. The initial velocity is directly proportional to momentum. A higher value increases the initial momentum and overshoots the animation. It is helpful for human-initiated animations and gestural interactions involving drag, tap, and swipe.
Illustrating Initial Velocity
The example above gets the initial velocity from the tap gesture
Sometimes, when animation is still in progress, a new animation can change the value of the animation’s target. When this situation occurs, the spring animation uses its speed during the retargeting phase as its initial velocity toward the new destination. The preview above demonstrates the speed of an animation in progress and the initial velocity of new retargeting positions. The interruptions from the incompleted animations make the entire animation look smooth and natural.
Why Springs
Across the Apple ecosystem, springs are the default animations for most interactions. For example, launching an app from its icon on iOS, tapping a list item to go to a detailed screen, and navigating from one screen to another have a smooth spring effect by default. To get a default spring animation for your views in SwiftUI, wrap the animation using withAnimation without specifying any customization.
withAnimation {
 isPlaying.toggle()
}
The following are some reasons why you may want to use spring animations in your apps.
Real-World Applications of Spring Animations
Springs can be used in your apps for:
Traditional Ways of Specifying Springs: An Overview (iOS 16 and?below)
To use spring animations in apps, we create a model that simulates an object attached to a spring in the physical world. The fundamental properties of the spring model consist of mass, stiffness, and damping. The above properties determine the type of spring motion that occurs and are used as the traditional way of specifying springs. You can customize the properties to build different animations. CardView.swift
This section introduces you to spring animations, specifically on iOS, and explains how best to use them in your apps. A spring in its basic form is defined by three properties: mass, stiffness, and damping.
You can use the above fundamental spring properties to define your animations. However, they are not as intuitive as the new springs in iOS 17+. SpringModeling.swift.
As seen above, the object’s animation has continuous position and velocity. A spring animation is excellent for moving an object from a resting position to a destination.
Springs can begin with no or any amount of initial velocity and cause the animation to slowly and gradually come to a resting position. A spring animation can start with any initial velocity, making the animation feel natural. The timings of the spring animation don’t line up perfectly. The misalignment of timing makes the animation feel natural to the eyes.
When To Use?Springs
Springs can be used in your apps for several cases, like the following.
Understanding Duration
Technically, a spring animation oscillates forever. To remove the animation, you should set a time interval. We call the time for the spring animation to be complete enough to be removed a settling duration. The settling duration differs from the perceptual duration of the spring and may depend on several factors.
In contrast to the predictability of the spring’s perceptual duration, the settling duration remains unpredictable. In spring animations for iOS 16 and below, the motion of the springs decays with a settling duration. iOS 17 introduces a perceptual duration parameter .bounce(duration: 1.0, extraBounce: 0.6), which, when set, causes a gradual feeling of coming to rest towards the target.
Advanced properties of an unrefined spring include:
Springs that use mass, stiffness, and damping do not depend on time. The absence of duration makes working with these springs difficult because their motion is unpredictable. The following sections will introduce you to a new way to specify your spring animations in SwiftUI.
A New Way To Specify Springs: Built-in Springs?Overview
iOS 17 invented a new way of defining spring specifications with duration and bounce. This specification defines a perceived duration and how bouncy an animation can be. The refined built-in springs help to create spring animations based on duration (time interval) and bounce. Increasing the duration makes the animation last longer, whereas increasing the bounce increases the springiness of the animation. Apple has adopted the new spring animation as the default on most platforms and apps.
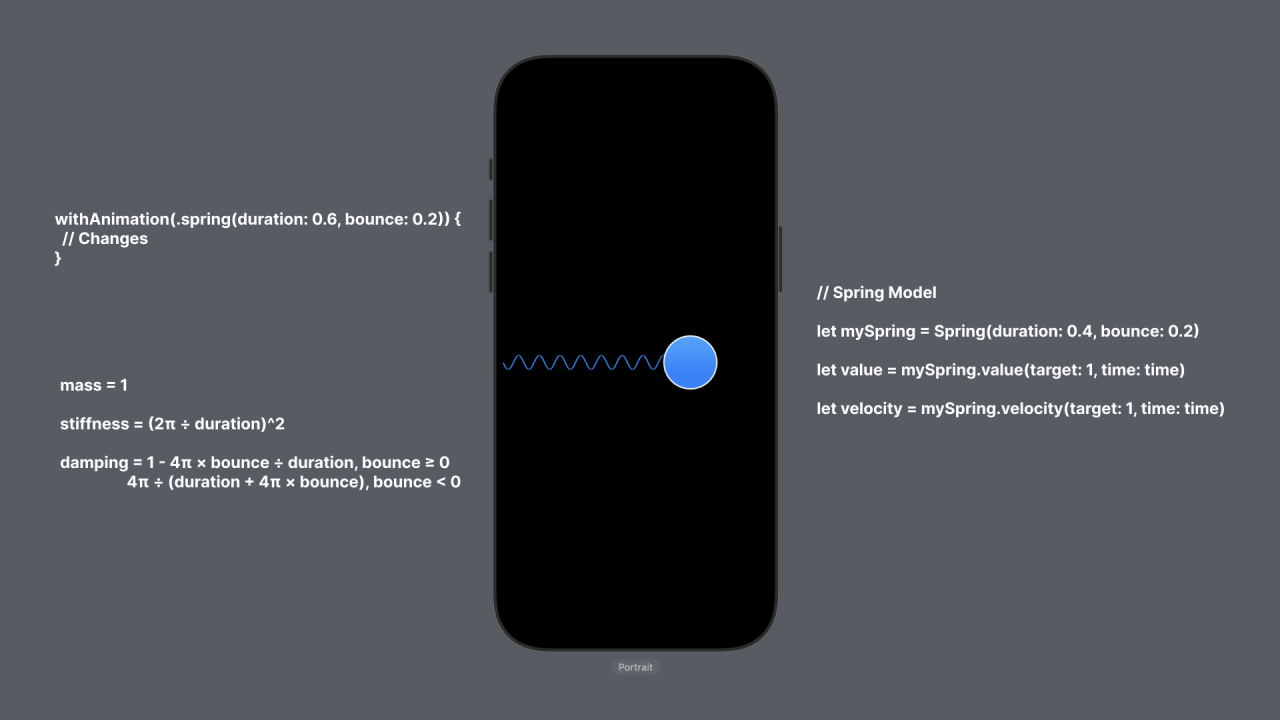
withAnimation(.spring(duration: 0.6, bounce: 0.2)) {
  // Changes
}
For example, adding: withAnimation { } with an unspecified parameter gives the same result as withAnimation(.smooth) { }.
Using Built-in Spring Presets (iOS?17+)
From iOS 17, you can add three built-in spring presets such as .smooth,`.snappy`, and .bouncy to your SwiftUI views. These presets have predefined duration and bounce values that can be fine-tuned.
From the preview above, all the examples look identical. However, reducing the playback speed will show a slight difference. Check out the SpringPresets folder of the Xcode project to see examples of each preset.
import SwiftUI

enum SmoothPhases {
    case start, middle, end
}

struct SmoothPreset: View {
    var body: some View {
        Rectangle()
            .fill(.blue.gradient)
            .frame(width: 200, height: 200)
            .phaseAnimator([SmoothPhases.start, .middle, .end], content: { view, smooth in
                view
                    .cornerRadius(smooth == .start ? 0 :
                                    smooth == .middle ? 32 : 100)
                    .rotationEffect(.degrees(smooth == .middle ? 180 : 0))
            }, animation: { smooth in
                switch smooth {
                case .start: return .smooth
                case .middle: return .smooth
                case .end: return .smooth
                }
            })
    }
}
These presets above provide excellent ways to experiment with springs if you need help figuring out where to start.
withAnimation(.bouncy) {
  // Changes
}
Customizing Built-in Spring Characteristics (iOS?17+)
The spring presets in iOS 17 support fine-tuning to create customized versions. For example, we can give a snappy, smooth, or bouncy spring a different duration or bounce value. The code snippet below demonstrates springs with a custom duration.
领英推荐
import SwiftUI

enum DurationPhases {
    case start, middle, end
}

struct SpringPresetWithCustomDuration: View {
    var body: some View {
        Rectangle()
            .fill(.blue.gradient)
            .frame(width: 200, height: 200)
            .phaseAnimator([DurationPhases.start, .middle, .end], content: { view, morthRotate in
                view
                    .cornerRadius(morthRotate == .start ? 0 :
                                    morthRotate == .middle ? 32 : 100)
                    .rotationEffect(.degrees(morthRotate == .middle ? 180 : 0))
            }, animation: { morthRotate in
                switch morthRotate {
                case .start: return .snappy(duration: 1.0)
                case .middle: return .smooth(duration: 1.0)
                case .end: return .bouncy(duration: 1.0)
                }
            })
    }
}
Refer to SpringPresetWithCustomBounce.swift in the Xcode project for an example that adds a custom bounce value.
Getting a Bouncy Spring (Underdamped): bounce >?0
A bouncy spring (bounce > 0) overshoots its target. In physics, this is called an underdamped spring. Changing the bounce value to 50% generates a bouncy spring. A 100% bounce value produces a cosine wave, oscillating the spring back and forth. Using the bounce value of 100% means the spring has no frictional force acting on it. The animation neither slows down nor reaches its final state. Decreasing the bounce value (`bounce = 0.5`) causes friction (damping) to act on the spring and slows the object attached to the spring.
Getting a Large Bounce: bounce = 0.3
A bounce value >= 0.3 results in a larger overshoot. You can use this kind of spring to build exaggerated animations.
import SwiftUI

enum LargeBouncePhases {
    case start, middle, end
}

struct SpringWithLargeBounce: View {
    var body: some View {
        Rectangle()
            .fill(.blue.gradient)
            .frame(width: 200, height: 200)
            .phaseAnimator([LargeBouncePhases.start, .middle, .end], content: { view, morthRotate in
                view
                    .cornerRadius(morthRotate == .start ? 0 :
                                    morthRotate == .middle ? 32 : 100)
                    .rotationEffect(.degrees(morthRotate == .middle ? 180 : 0))
            }, animation: { morthRotate in
                switch morthRotate {
                case .start: return .spring(duration: 0.5, bounce: 0.3)
                case .middle: return .spring(duration: 0.5, bounce: 0.3)
                case .end: return .spring(duration: 0.5, bounce: 0.3)
                }
            })
    }
}
Getting a Small Bounce: bounce = 0.15
A small bounce value of about 15% creates a spring effect that feels brisk and not bouncy.
import SwiftUI

enum SmallBouncePhases {
    case start, middle, end
}

struct SpringWithSmallBounce: View {
    var body: some View {
        Rectangle()
            .fill(.blue.gradient)
            .frame(width: 200, height: 200)
            .phaseAnimator([SmallBouncePhases.start, .middle, .end], content: { view, morthRotate in
                view
                    .cornerRadius(morthRotate == .start ? 0 :
                                    morthRotate == .middle ? 32 : 100)
                    .rotationEffect(.degrees(morthRotate == .middle ? 180 : 0))
            }, animation: { morthRotate in
                switch morthRotate {
                case .start: return .spring(duration: 0.5, bounce: 0.15)
                case .middle: return .spring(duration: 0.5, bounce: 0.15)
                case .end: return .spring(duration: 0.5, bounce: 0.15)
                }
            })
    }
}
Practical Examples of Bouncy Springs
A bouncy spring has several use cases. You can, for example, use it to:
Getting a Smooth Spring (Critically damped): bounce =?0
A no-bounce or general-purpose spring with bounce = 0 creates a gradual change and smooth curve. This spring animation curve is called a critically damped spring. Setting the bounce value to 0% removes all the oscillations in the spring, turning the curve into a rectilinear towards the target.
import SwiftUI

enum NoBouncePhases {
    case start, middle, end
}

struct SpringWithNoBounce: View {
    var body: some View {
        Rectangle()
            .fill(.blue.gradient)
            .frame(width: 200, height: 200)
            .phaseAnimator([NoBouncePhases.start, .middle, .end], content: { view, morthRotate in
                view
                    .cornerRadius(morthRotate == .start ? 0 :
                                    morthRotate == .middle ? 32 : 100)
                    .rotationEffect(.degrees(morthRotate == .middle ? 180 : 0))
            }, animation: { morthRotate in
                switch morthRotate {
                case .start: return .spring(duration: 0.5)
                case .middle: return .spring(duration: 0.5)
                case .end: return .spring(duration: 0.5)
                }
            })
    }
}
Practical Examples of Non-bouncy Springs
On iOS, you can find non-bouncy springs across many places, including the following.
Built-in Non-bouncy Spring Effects on iOS
Getting a Flatter Spring (Overdamped): bounce <?0
A spring with a negative bounce value (`bounce < 0`) creates a flatter spring animation than when bounce = 0. The resulting Physics spring curve is called an overdamped spring. FlatterOrOverdampedSpring.swift.
Defining a Spring Without?Friction
The bounce value must be 100% to create a spring animation with no friction, creating a cosine wave. The formation of a cosine curve/wave makes the spring oscillate forever.
Going Further: Creating Custom Springs .spring()
As some previous spring animations illustrate, you can specify the bounce and duration using this spring type .spring(). The bounce has a range of -1.0 to 1.0. Refer to CreateCustomSpring in the Xcode project navigator to see all the examples.
import SwiftUI

enum CustomSpringDurationPhases {
    case start, middle, end
}

struct CustomSpringDuration: View {
    var body: some View {
        Rectangle()
            .fill(.blue.gradient)
            .frame(width: 200, height: 200)
            .phaseAnimator([CustomSpringDurationPhases.start, .middle, .end], content: { view, morthRotate in
                view
                    .cornerRadius(morthRotate == .start ? 0 :
                                    morthRotate == .middle ? 32 : 100)
                    .rotationEffect(.degrees(morthRotate == .middle ? 180 : 0))
            }, animation: { morthRotate in
                switch morthRotate {
                case .start: return .spring(duration: 1.0)
                case .middle: return .spring(duration: 1.0)
                case .end: return .spring(duration: 1.0)
                }
            })
    }
}
Using SwiftUI’s Spring Model?Type
Aside from the ability to customize the built-in springs in iOS 17, SwiftUI allows modeling unrefined Springs (mass, stiffness, damping) with duration and bounce. The spring model type allows the creation of a representation of spring based on existing parameters (mass, stiffness, damping), which can be used directly as a parameter of the .spring() type. For example, you can model a spring as:
let mySpring = Spring(duration: 0.5, bounce: 0.2)
let (mass, stiffness, damping) = (mySpring.mass, mySpring.stiffness, mySpring.damping)
Check out the SpringModeling folder in the Xcode project for all examples.
Converting Springs: Calculate Damping and Stiffness
Using a spring model type, you can easily calculate the damping and stiffness of the spring with a given mass, bounce, and duration.
mass = 1
stiffness = (2π ÷ duration)2
damping = 1–4π × bounce ÷ duration, bounce ≥ 0
          4π ÷ (duration + 4π × bounce), bounce < 0
An example of this approach will be added later. To learn more, visit the Apple Developer video, Animate With Springs?—?WWDC23.
Build Advanced Spring Behaviors
You can call built-in spring methods such as value and velocity to model your advanced spring behaviors. These methods are useful for building simulations.
// Spring Model
let mySpring = Spring(duration: 0.4, bounce: 0.2)
let value = mySpring.value(target: 1, time: time)
let velocity = mySpring.velocity(target: 1, time: time)
Watch Animate With Springs?—?WWDC23 to learn more.
Spring Animation Best Practices
Springs can be very annoying when not used in the right way or for the appropriate purpose.
What’s Coming?Next?
The spring animation projects repo will be updated occasionally with diverse examples and use cases throughout 2025 and beyond. ?? or ? it to make it yours. If you have any questions or suggestions, please contact me at X or open an issue.
Software Architect @ VSight | iOS Developer
2 个月Very informative