Linux Basics : Demystifying the CentOS 7.x Boot Process
Introduction
Hello readers, the world of CentOS 7.x, it might seem like a another level of digital chaos. The BIOS kicks in – it's the system's wakeup call. MBR? That's the machine's heartbeat, a mere 512 bytes defining its existence. GRUB2 steps up, the gatekeeper dealing with /boot/grub2 – tweaking parameters is its game.
Now, initramfs is the real avant-garde, loading modules before the party starts. Dracut? It's the artist behind the scenes, crafting the connection between kernels and consciousness.
Kernel, is the maestro, firing up systemd – it's the grand organizer. Host names, networks, SELinux – all in a meticulous chaos of logic.
So, here we are, CentOS 7.x.
BIOS or Firmware phase:
Let's delve into the BIOS or Firmware phase – the initial steps in the symphony of CentOS 7.x booting.
The BIOS, or Basic Input/Output System, takes center stage, performing the crucial Power On Self Test (POST). This isn't a mere warm-up; it's a meticulous examination where the BIOS meticulously detects, tests, and initializes every hardware component in the system.
Once the hardware orchestra is tuned and ready, the BIOS proceeds to load the Master Boot Record (MBR).
Master Boot Record:
MBR, the first 512 bytes of the boot drive, stores the partition table and a small boot loader code. Within its confines, the MBR encapsulates essential information about the boot drive, including the partition table in the following 64 bytes. The last two bytes act as a checksum – a 'Magic Number' ensuring the integrity of the loaded data.
In the intricate dance of boot initiation, the MBR assumes the role of a detective. Its mission? Discover the bootable device, a crucial step in the system's quest for self-awareness. Having identified the protagonist, it gracefully passes the baton to the Grand Unified Bootloader (GRUB2), an adept conductor in this digital orchestra.
GRUB2 takes its place in memory, seizing control of the narrative.
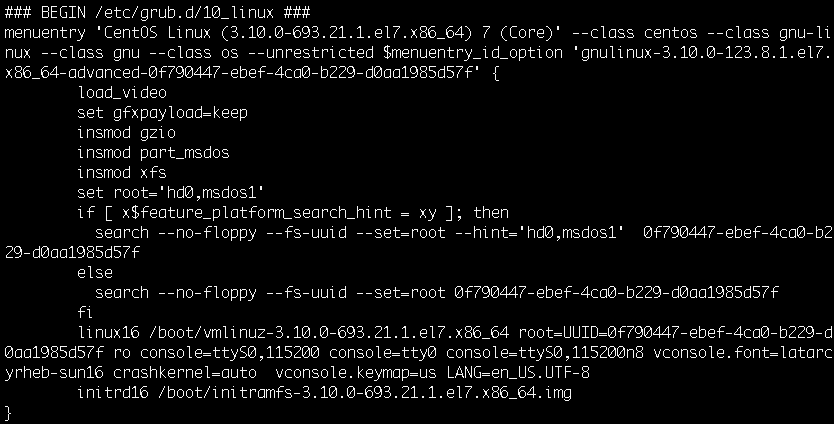
GRUB2 Bootloader:
The default bootloader program used on RHEL 7 is GRUB 2. GRUB2 is the intermediary, bridging the hardware and the impending kernel.
The GRUB 2 configuration file, residing at /boot/grub2/grub.cfg, is the maestro's score, dictating the rhythm of the system's boot performance.
Note : It's a sacred. Direct edits are to be made when you absolutely know what you are doing as as it holds the critical instructions for the system's startup.
Where does GRUB 2 gather its instructions, then? The playbook is sourced from /etc/default/grub, a file housing menu-configuration settings. This backstage document influences the decisions GRUB 2 makes when generating the essential grub.cfg. It's akin to a blueprint, detailing parameters such as timeouts and default boot options.
Sample /etc/default/grub file:
# GRUB_TIMEOUT=5GRUB_DEFAULT=saved
# GRUB_DISABLE_SUBMENU=true
# GRUB_TERMINAL_OUTPUT="console"
# GRUB_CMDLINE_LINUX="rd.lvm.lv=rhel/swap crashkernel=auto rd.lvm.lv=rhel/root rhgb quiet net.ifnames=0"
# GRUB_DISABLE_RECOVERY="true"
In the technical context of CentOS 7.x booting, understanding the dynamics of these files is key. So, remember to approach /boot/grub2/grub.cfg with care, and acknowledge the influence of /etc/default/grub in shaping GRUB2's performance.
Now, if/when adjustments are made to parameters in /etc/default/grub, a crucial step follows. To ensure these modifications take effect, you must execute 'grub2-mkconfig.'
[root@localhost~]# grub2-mkconfig –o /boot/grub2/grub.cfg
This command serves as the conductor, orchestrating the regeneration of the /boot/grub2/grub.cfg file. In essence, it updates the system's boot configuration based on the modified settings, ensuring that every tweak is seamlessly integrated into the CentOS 7.x boot sequence.
Firstly, GRUB2 conducts a search in the /boot directory for the compressed kernel image file, commonly known as 'vmlinuz.' This file, holding the kernel's essential code, is a prerequisite for the system's continuation.
Once located, GRUB2 proceeds to load the vmlinuz kernel image file into memory. This involves injecting vital instructions into the system's core. Following this, GRUB2 extracts the contents of the initramfs image file, establishing a temporary, memory-based file system known as tmpfs.
Initramfs
The initramfs, serving as the initial RAM disk, becomes the precursor to the authentic root file system. It's a preliminary platform, mounted before the primary root file system, ensuring that essential components are prepared before the final phase of the boot process.
The primary responsibility of the initramfs is to preload block device modules essential for the system's functionality. This includes modules for IDE, SCSI, or RAID – critical components that pave the way for the subsequent stages of the boot process. By doing so, the initramfs ensures a smooth transition to the root file system, where these modules traditionally reside, allowing for seamless access and mounting.
Functioning as a crucial link, the initramfs is intricately bound to the kernel. In a two-stage boot process, the kernel takes charge of mounting this initial RAM disk, solidifying its role as a transitional element between the hardware initialization and the system's core functionality.
To craft this vital initramfs, we turn to the dracut utility. Whenever a new kernel is installed, dracut works diligently behind the scenes, generating the initramfs tailored to the specific configuration. It's a meticulous process ensuring that the system is well-equipped
To inspect the contents of the initramfs meticulously crafted by dracut, the 'lsinitrd' command serves as a valuable tool.
[root@localhost~]# lsinitrd | less
The machine is now in a state where the kernel is poised to initiate the systemd process, setting the stage for system initialization tasks such as setting the hostname, initializing the network, mounting file systems, and other essential activities in the CentOS 7.x operating system.
Kernel
At this point in the CentOS 7.x boot sequence, the kernel has initiated the systemd process with a Process ID (PID) of 1. In the Linux operating system, the systemd process serves as the ancestor of all other processes, marking the beginning of the user space.
领英推荐
root 1 ?0 0 02:10 ? 00:00:02?/usr/lib/systemd/systemd?--switched-root --system --deserialize 23
Systemd, as the first process, assumes a critical role in managing and coordinating various system initialization tasks.
This stage is pivotal in transitioning from the kernel's low-level interactions with the hardware to the higher-level functionalities of the CentOS 7.x system, marking the commencement of the user space and the system's readiness for user interactions and services.
Systemd
Systemd takes center stage as the parent, or ancestor, of all processes in the system. Its primary responsibility is orchestrating the system initialization tasks that pave the way for the operating system's full functionality.
Systemd's initial move involves reading the file specified by the symbolic link at /etc/systemd/system/default.target. This file, exemplified by /usr/lib/systemd/system/multi-user.target, defines the default system target, serving as the equivalent of traditional run levels. The chosen target file outlines the services that systemd is tasked with initiating.
Upon determining the default system target, systemd efficiently executes a series of system initialization tasks. This includes essential activities such as setting the hostname, initializing the network, configuring SELinux based on its predetermined specifications, displaying a welcome banner, initializing system hardware based on kernel boot arguments, and mounting file systems. Notably, systemd ensures the orderly cleanup of directories in /var and initiates the swapping process.
In essence, systemd brings the CentOS 7.x system to a defined state, seamlessly integrating and managing these foundational tasks to establish a fully operational environment for user interactions and services.
Conclusion
The CentOS 7.x boot journey—from BIOS to systemd—culminates in a fully operational state. With systemd at the helm, system tasks are executed, setting the stage for user interactions. This exploration equips users for effective troubleshooting and optimization, laying the foundation for efficient resource management.
Want more ? STATS FOR NERDS !
GRUB2 Configuration Details
The /etc/default/grub file is a crucial component in configuring the GRUB2 bootloader. It contains various options that dictate the boot sequence, timeout settings, and kernel command line arguments. Here's an explanation of some key options:
Remember: Modifying /etc/default/grub requires regenerating the actual boot configuration file using the grub2-mkconfig -o /boot/grub2/grub.cfg command for the changes to take effect.
This explanation provides a basic understanding of some critical GRUB2 configuration options and highlights the importance of careful editing due to its impact on the boot process. For a complete list and detailed information on all available options, you can refer to the official GRUB2 documentation: https://www.gnu.org/software/grub/manual/grub/html_node/Configuration.html
More details on initramfs
The initramfs (initial RAM filesystem) serves a critical role in the early stages of the boot process by providing essential components before the main root filesystem is mounted. It typically holds various types of modules that enable the system to access and utilize hardware and software resources during boot. Here's a breakdown of some common types of content found in an initramfs:
1. Filesystem Drivers:
2. Hardware Drivers:
3. Block Device Modules:
4. Additional Utilities:
The specific content of an initramfs can vary depending on the system configuration and specific requirements. However, understanding these different types of modules provides a general idea of what the initramfs typically encompasses and its role in facilitating a smooth boot process.
systemd Targets Explained
systemd, the system and service manager in CentOS 7.x, utilizes the concept of targets to define different operational states the system can be in. These targets act like checkpoints, specifying which services and components should be running for a particular system state. Understanding the different types of targets clarifies how systemd manages the boot process and controls the overall system behavior.
Here's an overview of some common systemd targets:
1. multi-user.target: This is the default target in most CentOS 7.x systems. It represents a multi-user environment with basic functionalities like network access, logging, and the ability to run user applications. This target is suitable for most server or workstation use cases.
2. graphical.target: This target initiates a graphical user interface (GUI) environment in addition to the functionalities provided by multi-user.target. This target is typically used on desktop systems.
3. rescue.target: This target brings the system up in a minimal rescue mode, primarily used for troubleshooting and system recovery purposes. It allows access to essential tools and commands for diagnosing and fixing system issues.
4. poweroff.target: This target initiates a system shutdown and prepares the hardware for power off.
5. reboot.target: This target initiates a system reboot, similar to poweroff.target but followed by a restart without complete power off.
6. Network Targets: systemd also offers various network-related targets like network.target and net.target. These targets manage the network interface initialization process at different stages of the boot sequence.
These are just a few examples, and the specific available targets can vary depending on the system configuration and installed packages. Additionally, systemd allows creating custom targets by combining existing ones, providing flexibility in managing complex system states.
Understanding systemd targets is crucial for:
|| Linux | Git | FOSS | Python ||
1 年TLDR (3/3) ; Initramfs – The job of the initial RAM file system is to preload the block device modules, such as for IDE, SCSI, or RAID, so that the root file system, on which those modules normally reside, can then be accessed and mounted. – The initramfs is bound to the kernel and the kernel mounts this initramfs as part of a two-stage boot process. – The dracut utility creates initramfs whenever a new kernel is installed. Kernel – The kernel starts the systemd process with a process ID of 1 (PID 1). Systemd – systemd is the ancestor of all processes on a system. – systemd reads the file linked by /etc/systemd/system/default.target (for example, /usr/lib/systemd/system/multi-user.target) to determine the default system target (equivalent to run level). The system target file defines the services that systemd starts.
|| Linux | Git | FOSS | Python ||
1 年TLDR (2/3) ; GRUB2 Bootloader: – The default bootloader program used on RHEL 7 is GRUB 2. GRUB stands for GRand Unified Bootloader. GRUB 2 replaces the older GRUB bootloader also called as legacy GRUB. – The GRUB 2 configuration file is located at /boot/grub2/grub.cfg (Do not edit this file directly). – GRUB 2 menu-configuration settings are taken from /etc/default/grub when generating grub.cfg. – If changes are made to any of these parameters, you need to run grub2-mkconfig to re-generate the /boot/grub2/grub.cfg file. – GRUB2 searches the compressed kernel image file also called as vmlinuz in the /boot directory. – GRUB2 loads the vmlinuz kernel image file into memory and extracts the contents of the initramfs image file into a temporary, memory-based file system (tmpfs). – The initial RAM disk (initrd) is an initial root file system that is mounted before the real root file system.
|| Linux | Git | FOSS | Python ||
1 年TLDR (1/3) ; Boot process sequence (CentOS 7.x) BIOS or Firmware phase: – The BIOS (Basic Input/Output System), performs the POST (Power On Self Test) to detect, test and initialize system hardware components. – Loads the MBR (Master boot record). Master Boot Record: – Master Boot Record (MBR) is the first 512 bytes of the boot drive that is read into memory by the BIOS. – The next 64 bytes contain the partition table for the disk. The last two bytes are the “Magic Number” which is used for error detection. – MBR discovers the bootable device and loads the GRUB2 boot loader into memory and transfers control over to it.