Jenkins CI/CD Pipeline Setup
Jenkins CI/CD Pipeline with GitHub + Maven + Nexus + SonarQube + Tomcat
Here we will complete our setup in 6 steps
Step - 1. Environment Setup
1.1)?In AWS Portal create a new instance as,
Name??: Jenkins-server
AMI?????: Ubuntu
Instance type??: t2.micro?(free tier)
Key pair : create
Allow: HTTP & HTTPS
Allow: port number : 8080 (Jenkins default port number)
Allow : SSH 22
1.2)?Connect to Ubuntu VM using MobaXterm
1.3)?Now install Jenkins on the machine, by following this link
https://www.jenkins.io/doc/book/installing/linux/#debianubuntu
1.4)?Now copy the public IP of the machine and paste it to the browser to access the Jenkins Portal.
VM Public IP : 8080
Ex: 11.22.33.44:8080
1.5)?Now click on, “install suggested plugins”
1.6)?This will install all suggested plugins
1.7)?Now the Jenkins is ready to use
1.8)?Jenkins home page
1.9)??Create a CI/CD Pipeline,
From Jenkins Dashboard click on “New Item”
1.10)?Create a pipeline for project
Enter an item name --> choose project name
Click on pipeline option --> ok
Step - 2. Source Code Clone from GitHub
2.1)?Select pipeline syntax?
2.2)?Select GitHub Repository URL ?and add credentials?
2.3)??Add GitHub pipeline syntax same like below
2.4)?Git Clone completed successfully
Step - 3) Maven Build
3.1)?Add Maven in Global Tool Configuration
3.2)?Select Maven name & Maven version
3.3)?Write pipeline syntax to build java project?
3.4)?Maven build Success and target folder created
Step - 4) SonarQube Scanner
4.1)?In AWS Portal, create a new instance as,
Name??: Sonar-Server
AMI?????: Amazon Linux
Instance type??: t2.micro (free tier)
Key pair: create
Allow: port number: 9000 (SonarQube default port number)
4.2)?Install SonarQube software and check sonar running
4.3)?Now copy the public IP of sonar-server machine and paste it to the browser to access the sonar server
Sonar-server public IP: 9000
4.4)?SonarQube Login page
4.5)?Create new project
领英推荐
4.6)?Download SonarQube Scanner plug in
4.7)?Configure Sonar in global tool configuration
4.8)?Configure Sonar in configure system
4.9)?Configure Sonar syntax like below
4.10)?SonarQube build success
4.11)?SonarQube project uploaded to Sonar portal
Step - 5) Nexus Artifactory
5.1)?In AWS Portal, create a new instance as,
Name??: Nexus
AMI?????: Amazon Linux
Instance type??: t2.micro (free tier)
Key pair: create
Allow: port number: 8081 (Nexus default port number)
5.2)?Connect ec2 machine using MobaXterm
5.3)?Download nexus software?
5.4)?Login to Nexus
5.5)?Create Repository to store Artifacts
5.6)?Download nexus Plugin from Manage Jenkins
5.7)?Select pipeline syntax option
Sample step --> nexus artifact uploder:nexus artifact uploader
Nexus version select --> S3
Protocol --> HTTP
Nexus URL --> ex: 11.22.123.456:8081
Credentials -> nexus credentials
Group id--> in.mounika
Version -->1.0-SNAPSHOT
Repository --> Repository name
Artifact id --> artifact name (ex: 01-maven-web-app)
Type --> war
File --> target/01-maven-web-app.war (war file location)
Copy pipeline syntax and paste in script?
5.8)?Nexus Pipeline Syntax
5.9)?Artifacts uploaded to Nexus Portal
Step - 6) Tomcat Deploy
6.1)?In AWS Portal, create a new instance as,
Name??: Tomcat-Server
AMI?????: Amazon Linux
Instance type??: t2.micro (free tier)
Key pair: create
Allow: port number: 8080 (Nexus default port number)
6.2)?Connect ec2 machine using MobaXterm
6.3)?Download tomcat server?
6.4)?Login into Tomcat server
6.5)?Tomcat plugin installation go to Jenkins page???
6.6)?Tomcat syntax
6.7)?Tomcat build success
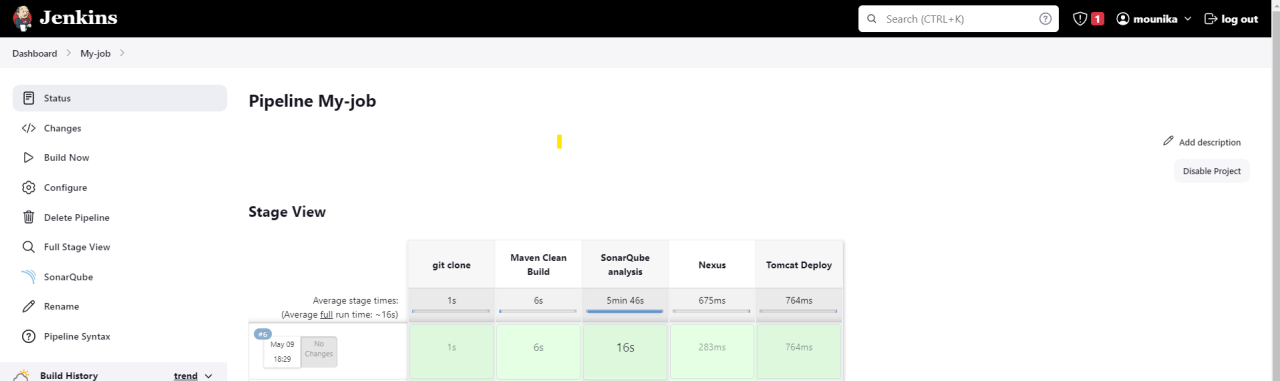
6.8)?Successfully Project deployed to tomcat server
Click on project name
Happy Learning! :)
Thank you for Reading. I hope you found this article helpful.
~ Mounika Jilakari.
Lead Engineer - DevOps at Avrioc Technologies
1 年??