Implementing Cross Panel Drag and Drop in Reactjs with Redux and Spring-Boot Backend
Amit Thakur
Senior Software Engineer(Full Stack), Enterprise Architecture, Big Data Analytics, Business Strategy, NUS MBA
Quite often, as developers, we are asked to implement functionality to drag an item from one panel on the screen and drop it onto the same or another panel to trigger some action. But, whenever there’s a gap of a few days, I often found myself spending time setting up the libraries and needed to remind myself how to implement this. So, I’ve written this article to help my future self and other developers who may need to implement similar functionality in the future.
Code Repository: https://github.com/amitthk/react-redux-drag-n-drop-todo/tree/master
The project consist two parts:
1. Frontend: A React app named frontend built using create-react-app.
2. Backend: Spring Boot API to handle data about todos and schedules.
Let us take a look at the initial setup the frontend of this app. The setup is straightforward, first we initiate the react app using npx create-react-app.
- Initial Setup:
First, create a React app and install the libraries:
npx create-react-app frontend
cd frontend
npm install bootstrap react-bootstrap bootstrap-icons react-redux redux @reduxjs/toolkit axios react-calendar moment react-router-dom react-beautiful-dnd
Please note the following libraries in the project.json install the following libraries :
Bootstrap , react-bootstrap and bootstrap-icons (for visual look and feel) React-calendar, moment for date time functions React-redux, redux for redux React-dom for navigation React-beautiful-dnd* => this is one important library we are going to use for drag and drop. React-date-picker => we used this for the date picker in right hand panel
{
  "name": "frontend",
  "version": "0.1.0",
  "private": true,
  "dependencies": {
    "@reduxjs/toolkit": "^2.5.0",
    "axios": "^1.7.9",
    "bootstrap": "^5.3.3",
    "bootstrap-icons": "^1.11.3",
    "cra-template": "1.2.0",
    "moment": "^2.30.1",
    "react": "^18.3.1",
    "react-beautiful-dnd": "^13.1.1",
    "react-bootstrap": "^2.10.7",
    "react-calendar": "^5.1.0",
    "react-date-picker": "^11.0.0",
    "react-dom": "^18.3.1",
    "react-redux": "^9.2.0",
    "react-router-dom": "^7.1.1",
    "react-scripts": "5.0.1",
    "redux": "^5.0.1",
    "web-vitals": "^4.2.4"
  },
 ...
}
Next thing is simple, we created the redux store.js and added the store as provider to our app at the top.
2. Adding Redux Store
Create a store.js file to configure Redux :
frontend/src/reducers/store.js
import { configureStore } from '@reduxjs/toolkit';
import todoReducer from './todoSlice';
import schedulerSlice from './schedulerSlice';

export const store = configureStore({
  reducer: {
    todos: todoReducer,
    schedules: schedulerSlice
  },
});
Note, we had to remove React.StrictMode to make the Droppable component working. Otherwise we get the error “Invariant failed: Cannot find droppable entry with idâ€. There are better alternatives to solve this but for the purpose of this article we use this simpler approach.
frontend/src/index.js
import React from 'react';
import ReactDOM from 'react-dom/client';
import './index.css';
import App from './App'; // Make sure this points to your main App component
import reportWebVitals from './reportWebVitals';
import 'bootstrap/dist/css/bootstrap.min.css';
import { Provider } from 'react-redux';
import { store } from './reducers/store'; // Import the store from your store.js file

const root = ReactDOM.createRoot(document.getElementById('root'));
root.render(
    <Provider store={store}>
      <App />
    </Provider>
);

reportWebVitals();
Please take a look at the schedulerSlice which basically handles the date alignment and interaction with backend. Also it updates the index of the items as we drag and drop them:
frontend/src/reducers/schedulerSlice.js
import { createSlice, createAsyncThunk } from '@reduxjs/toolkit';
import apiClient from '../services/apiClient';
import { formatDate } from '../services/util';

const API_BASE_URL = '/api/schedules';

// Async actions
export const fetchSchedules = createAsyncThunk('schedules/fetchSchedules', async () => {
  const response = await apiClient.get(API_BASE_URL);
  return response.data;
});

export const fetchScheduleByDate = createAsyncThunk('schedules/fetchScheduleByDate', async (date) => {
  const formattedDate = formatDate(date);
  if (!formattedDate) throw new Error('Invalid date format');
  const response = await apiClient.get(`${API_BASE_URL}/${formattedDate}`);
  return response.data;
});

export const addTodoToSchedule = createAsyncThunk(
  'schedules/addTodoToSchedule',
  async ({ date, todo }) => {
    const formattedDate = formatDate(date);
    if (!formattedDate) throw new Error('Invalid date format');
    const response = await apiClient.post(`${API_BASE_URL}/${formattedDate}/todo`, todo);
    return response.data;
  }
);

export const reorderTodosInSchedule = createAsyncThunk(
  'schedules/reorderTodosInSchedule',
  async ({ date, reorderedTodos }) => {
    const formattedDate = formatDate(date);
    if (!formattedDate) throw new Error('Invalid date format');
    //const todoIds = reorderedTodos.map((todo) => todo.todo.id); // Send only the IDs
    const response = await apiClient.put(`${API_BASE_URL}/${formattedDate}/reorder`, reorderedTodos);
    return response.data;
  }
);


const initialState = {
  schedules: [],
  selectedDate: new Date().toISOString(),
  status: 'idle',
  error: null,
};

const updateScheduleInState = (state, newSchedule) => {
  const index = state.schedules.findIndex((schedule) => schedule.date === newSchedule.date);
  if (index !== -1) {
    state.schedules[index] = newSchedule;
  } else {
    state.schedules.push(newSchedule);
  }
};

const scheduleSlice = createSlice({
  name: 'schedule',
  initialState,
  reducers: {
    setSelectedDate: (state, action) => {
      state.selectedDate = action.payload;
    },
  },
  extraReducers: (builder) => {
    builder
      .addCase(fetchSchedules.fulfilled, (state, action) => {
        state.schedules = action.payload;
      })
      .addCase(fetchScheduleByDate.fulfilled, (state, action) => {
        updateScheduleInState(state, action.payload);
      })
      .addCase(addTodoToSchedule.fulfilled, (state, action) => {
        updateScheduleInState(state, action.payload);
      })
      .addCase(reorderTodosInSchedule.fulfilled, (state, action) => {
        updateScheduleInState(state, action.payload);
      });
  },
});

export const { setSelectedDate } = scheduleSlice.actions;
export default scheduleSlice.reducer;
Let us look at the structure of the frontend app first. Pardon the left hand menu, the left panel in home page contains a todo list, we can add items to this todo list and can drag and drop them to update their order. The second panel is schedule panel which we can drag todo(s) from TodoItemsList list left panel to the schedule panel in the middle.
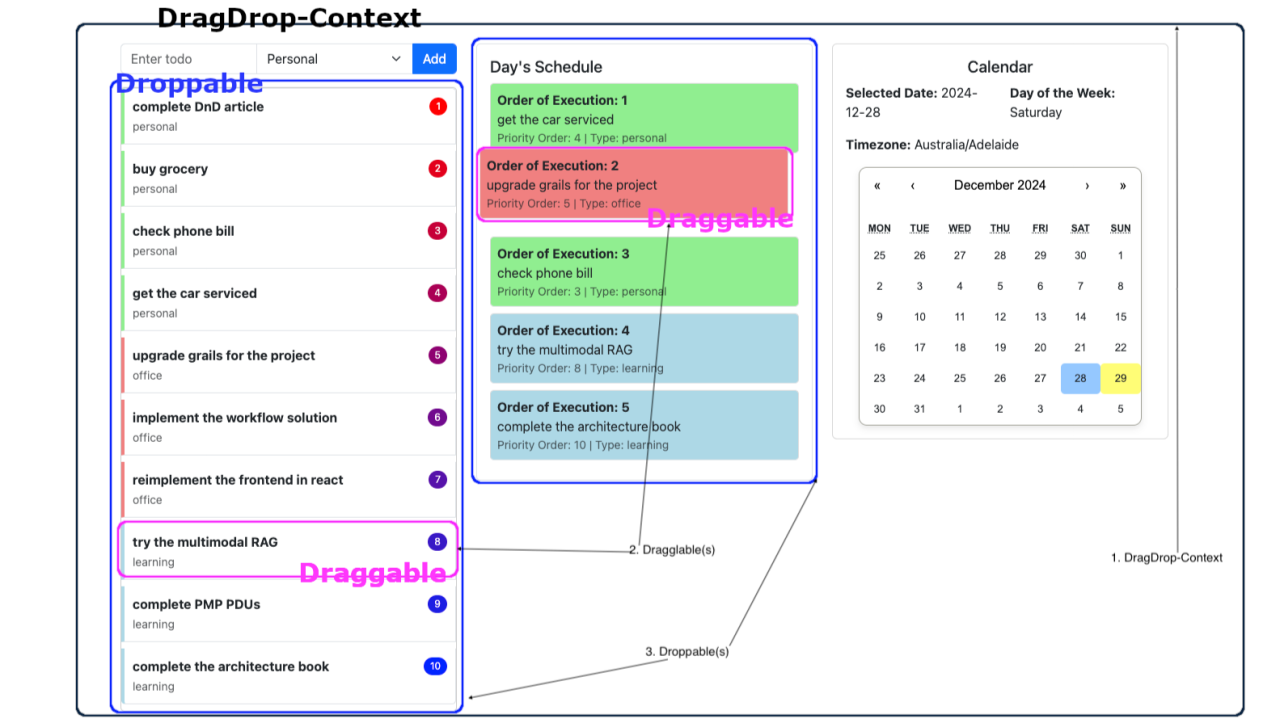
Now let us look at the setup of the Drag and Drop. The main context of the the drag and drop is in Home.jsx which contains the actual panels which are doing the drag and drop. The whole drag and drop works on the primarily 3 components shown in below image:
- DragDropContext
- Droppable(s) — each droppable should have one unique droppableId
- Draggable(s) — each of the item with unique draggableId
One thing we will need to make sure is that the top level container should be wrapped inside DragDropContext otherwise you will see the error “Uncaught Error: Could not find “store†in the context of “Connect(Droppable)â€. Either wrap the root component in a <Provider>, or pass a custom React context provider to <Provider> and the corresponding React context consumer to Connect(Droppable) in connect options.â€
DragDropContext (frontend/src/pages/Home.jsx):
      <DragDropContext onDragEnd={handleDragEnd}>
        <div className="row">
          <div className="col-md-4">
            <TodoInput />
            <TodoListPanel />
          </div>
          <div className="col-md-4">
            <SchedulePanel selectedDate={selectedDate} />
          </div>
          <div className="col-md-4">
            <CalendarPanel date={selectedDate} onDateChange={handleDateChange} />
          </div>
        </div>
      </DragDropContext>
Droppable (frontend/src/components/TodoListPanel.jsx):
These are the droppable panels one in the TodoListPanel and the other in the SchedulePanel in our frontend app.
   <Droppable droppableId="todo-list">
      {(provided) => (
        <div
          ref={provided.innerRef}
          {...provided.droppableProps}
          className="list-group"
          style={{
            minHeight: '100px',
            border: '1px solid #ccc',
            borderRadius: '5px',
          }}
        >
//other draggable components
</Droppable>
Draggable:
Most of the code below is pretty much of styling. One thing to note about this is that each Draggable item has a unique draggableId:
<Draggable key={todo.id} draggableId={todo.id.toString()} index={index}>
                {(provided) => (
                  <div
                    ref={provided.innerRef}
                    {...provided.draggableProps}
                    {...provided.dragHandleProps}
                    className="list-group-item"
                    style={{
                      ...provided.draggableProps.style,
                      margin: '0 0 8px 0',
                      borderLeft: `4px solid ${getTodoTypeColor(todo.type)}`,
                      padding: '10px',
                    }}
                  >
                    <div className="d-flex justify-content-between align-items-center">
                      <strong>{todo.text}</strong>
                      <span
                        style={{
                          backgroundColor: getPriorityColor(todo.priorityOrder),
                          borderRadius: '12px',
                          padding: '2px 8px',
                          color: '#fff',
                          fontSize: '12px',
                        }}
                      >
                        {todo.priorityOrder}
                      </span>
                    </div>
                    <small
                      className="text-muted"
                      style={{
                        color: getTodoTypeColor(todo.type),
                      }}
                    >
                      {todo.type || 'General'}
                    </small>
                  </div>
                )}
              </Draggable>
Drag and Drop Logic
The handleDragEnd function (in the frontend/src/pages/Home.jsx) is important to note as this manages the drag-and-drop interactions on the two droppable panels. Below code will be simple to understand from the comments, it basically handles what happens when an item is moved within the todo-list or the schedule-panel:
const handleDragEnd = (result) => {
    if (!result.destination) return;

    const { source, destination } = result;

    // Reorder within TodoListPanel
    if (source.droppableId === 'todo-list' && destination.droppableId === 'todo-list') {
      const reorderedTodos = Array.from(todos);
      const [movedTodo] = reorderedTodos.splice(source.index, 1);
      reorderedTodos.splice(destination.index, 0, movedTodo);
      dispatch(updateTodos(reorderedTodos));
    }

    // Add a todo to SchedulePanel
    if (source.droppableId === 'todo-list' && destination.droppableId === 'schedule-panel') {
      const todo = todos[source.index];
      dispatch(addTodoToSchedule({ date: selectedDate, todo }));
    }

    // Reorder within SchedulePanel
    if (source.droppableId === 'schedule-panel' && destination.droppableId === 'schedule-panel') {
      const currentSchedule =
        schedules.find((schedule) => schedule.date === selectedDate)?.scheduledTodos || [];
      const reorderedTodos = Array.from(currentSchedule);
      const [movedTodo] = reorderedTodos.splice(source.index, 1);
      reorderedTodos.splice(destination.index, 0, movedTodo);

      // Update `orderOfExecution`
      const updatedScheduledTodos = reorderedTodos.map((item, index) => ({
        ...item,
        orderOfExecution: index + 1,
      }));

      dispatch(reorderTodosInSchedule({ date: selectedDate, reorderedTodos: updatedScheduledTodos }));
    }
  };
Backend Overview
The backend is a simple Spring Boot api which manages the todos and schedules in an H2 database for the demo project. The backend can be switched to actual database for real implementation:
Key Endpoints
- Todos:
- GET /api/todos: Fetch all todos.
- POST /api/todos: Create a new todo.
- PUT /api/todos/{id}: Update a todo.
- Schedules:
- GET /api/schedules: Fetch all schedules.
- GET /api/schedules/{date}: Fetch schedule for a specific date.
- POST /api/schedules: Create or update a schedule.
- POST /api/schedules/{date}/todo: Add a todo to a schedule.
Final Thoughts
This sample app shows how to implement drag-and-drop functionality using react-beautiful-dnd with React redux and interact it with a backend API written in Spring Boot. It is a functional and maintainable app with reusable components and proper separation of concerns. I really hope that documenting these libraries and components will save myself and others some time in the future when we have to implement the similar functionality.