Creating Distributed State Machines in Java
Motivation
I want a framework to model complex business processes by breaking them down into simpler steps. Creating my own custom state machine empowers me to automate complex systems and develop AI agents.
While there are libraries like Spring State Machine for creating state machines, they have limitations:
InnoBridge StateMachine (ISM) is a developer-friendly library for creating distributed state machines. Transitions between states are defined programmatically using Java functions, and ISM supports the creation of child state machines.
Github Repo: https://github.com/InnoBridge/StateMachine
Architecture
State
Our state machine consists of the State interface, which executes the action function when being processed.
public interface State {
   void action(Optional<JsonNode> input);
}
Every state machine instance must consists of the InitialState and TerminalState.
Initial State
InitialState is the starting point of our state machine instance, it is responsible for instantiating our state machine, and defining the transitions from one state and another.
When we create our Initial State class we extend AbstractInitialState because it contains the boilerplate code for processing the state.
public class InitialHelloWorld extends AbstractInitialState {

    @Override
    public void action(Optional<JsonNode> input) {
        System.out.println("Initializing Hello World");
    }

    @Override
    public void setTransitions() {
        Map<State, Function<State, State>> transitions = new HashMap<>();
        transitions.put(this, state -> new WhatIsYourName());
        transitions.put(new WhatIsYourName(), state -> new HelloWorld());
        transitions.put(new HelloWorld(), state -> {
            HelloWorld helloWorld = (HelloWorld) state;
            return new NonBlockingHelloWorld(helloWorld.getName());
        });
        transitions.put(new NonBlockingHelloWorld(null), state -> new TerminalHelloWorld());
        this.transitions = transitions;
    }
}
We define the transitions of the setTransitions method as map of Java functions. Where they key of the map is the source state, and the state returned by the Java function is the destination state of the transition.
transitions.put(new HelloWorld(), state -> {
            HelloWorld helloWorld = (HelloWorld) state;
            return new NonBlockingHelloWorld(helloWorld.getName());
        });
The above shows how we can pass value from the source state and the destination state.
Terminal State
The TerminalState represents the end of a state machine instance, it is responsible for cleaning up the state machine instance. You can implement your own Terminal State by extending AbstractTerminalState.
public class TerminalHelloWorld extends AbstractTerminalState {

    @Override
    public void action(Optional<JsonNode> input) {
        System.out.println("Terminating Hello World");
    }

    @Override
    public Optional<Map<String, Object>> getPayload() {
        return Optional.empty();
    }
}
The getPayload is a method that returns data from a child state machine to parent state machine, since the current state machine is a parent state machine we return an empty payload.
Non Blocking Transition State
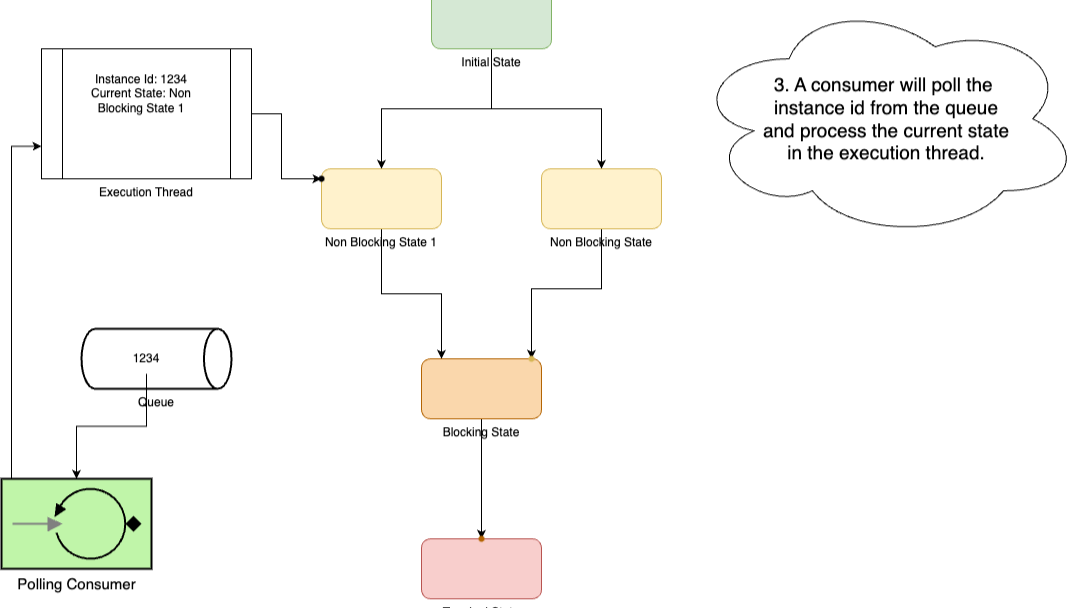
A NonBlockingTransitionState is a state that the transition from previous state to the current state(Non Blocking) happens automatically without needing external triggers. When the previous state has been processed, and the transition is to a non blocking state a message with the state machine instance id is published to a queue. A consumer will read the instance id from the queue and process the non blocking state.
public class NonBlockingHelloWorld extends AbstractNonBlockingTransitionState {

    private String name;

    public NonBlockingHelloWorld(String name) {
        super();
        this.name = name;
    }

    @Override
    public void action(Optional<JsonNode> input) {
        System.out.println("Non BlockingHello World " + name);
    }
}
Blocking Transition State
A BlockingTransitionState is a state that pauses the execution of the state machine instance, waiting from an external trigger.
The state machine resumes when the processStateMachine API in the StateMachineService is called with the state machine instance id and an optional input JSON payload.
Eg. HelloWorld
public class HelloWorld extends AbstractBlockingTransitionState {

    private String name;

    public String getName() {
        return name;
    }

    @Override
    public void action(Optional<JsonNode> input) {
        input.ifPresentOrElse(json -> {
            System.out.println("Hello " + json.get("name").asText());
            this.name = json.get("name").asText();
        }, () -> {
            System.out.println("Hello World without input");
        });
    }
}
Child State
A ChildState is a state that allows you to spin up child state machine instance from a parent instance. The parent state machine instance will be block until all the child instance has finished executing.
To create child instance we define a list of initial states in the registerChildInstances method.
领英推荐
Eg. ChildMeal
public class ChildMeal extends AbstractChildState {

    private String breakfast;
    private String lunch;
    private String dinner;

    String getBreakfast() { return breakfast; }
    String getLunch() { return lunch; }
    String getDinner() { return dinner; }

    void setBreakfast(String breakfast) { this.breakfast = breakfast; }
    void setLunch(String lunch) { this.lunch = lunch; }
    void setDinner(String dinner) { this.dinner = dinner; }

    @Override
    public List<InitialState> registerChildInstances() {
        return List.of(
                new InitialBreakfast(),
                new InitialLunch(),
                new InitialDinner()
        );
    }

    @Override
    public void action(Map<String, Object> input) {
        if (input.containsKey("breakfast")) {
            setBreakfast(input.get("breakfast").toString());
        }
        if (input.containsKey("lunch")) {
            setLunch(input.get("lunch").toString());
        }
        if (input.containsKey("dinner")) {
            setDinner(input.get("dinner").toString());
        }
    }
}
The registerChildInstance registers the child state machine instances that the ChildMeal state is going to spin up when the parent state reaches the ChildMeal state. To register the child state machine we just need to return the initial states of each child state machine instance in a list.
When a child queue has finished execution its getPayload method will return a payload which will invoke the action method in the parent state machine. Here we capture the payload as “breakfast”, “lunch” or “dinner” and store the data as attributes of ChildMeal.
ExecutionThread
An ExecutionThread keeps track of the current state in a state machine instance. It has the following fields:
Requirements
To make the state machine distributed we need to persist the states and execution thread in database. We store the states and execution thread in the MongoDB collections States and StateMachineInstance respectively.
Setup
Add the following dependency in pom.xml
<dependency>
   <groupId>io.github.innobridge</groupId>
   <artifactId>statemachine</artifactId>
   <version>1.0.0</version>
 </dependency>
Developing Locally
Refer to this demo repo: https://github.com/InnoBridge/StateMachineDemo
We will use docker to set up the infrastructure (MongoDB, RabbitMQ) docker-compose.yml
services:

  ############ statemachine application ############
  statemachine_application:
    image: openjdk:22-slim
    container_name: statemachine-application
    working_dir: /app
    extra_hosts:
      - "localhost:192.168.65.2"
    ports:
      - 8080:8080
      - 5005:5005
    env_file:
      - .env
    volumes:
      - .:/app
      - /var/run/docker.sock:/var/run/docker.sock
      - ./local/root:/root
    tty: true

  ############ mongodb ############
  mongodb:
    image: mongo:latest
    container_name: mongodb
    ports:
      - "${MONGODB_PORT}:27017"
    volumes:
      - mongodb_data:/data/db
    environment:
      - MONGO_INITDB_ROOT_USERNAME=${MONGODB_ROOT_USERNAME}
      - MONGO_INITDB_ROOT_PASSWORD=${MONGODB_ROOT_PASSWORD}

  ############ rabbitmq ############
  rabbitmq:
    image: rabbitmq:3-management
    container_name: rabbitmq
    ports:
      - "5672:5672"   # AMQP protocol port
      - "15672:15672" # Management UI port
    environment:
      - RABBITMQ_DEFAULT_USER=admin
      - RABBITMQ_DEFAULT_PASS=admin
    volumes:
      - rabbitmq_data:/var/lib/rabbitmq

volumes:
  mongodb_data:
  rabbitmq_data:
to create your states, and the InitialState to define the transaction for your workflow.
Component Scan State Machine Library
In Application.java scan the state machine base package.
@SpringBootApplication
@EnableMongoRepositories(basePackages = "io.github.innobridge.statemachine.repository")
@ComponentScan(basePackages = {
    "io.github.innobridge.statemachinedemo",
    "io.github.innobridge.statemachine"
})
public class Application {
    public static void main(String[] args) {
        SpringApplication.run(Application.class, args);
    }
}
(Optional) Creating Controller
Creating controller to create your state machine instance, and call processStateMachine API to trigger a blocking state.
@RestController
public class StateMachineController {

    @Autowired
    private StateMachineService stateMachineService;

    @PostMapping("/create/helloworld")
    public String createHelloWorld(
            @RequestBody(required = false) JsonNode input
    ) {
        return stateMachineService.createStateMachine(new InitialHelloWorld(), Optional.ofNullable(input), Optional.empty());
    }

    @PostMapping("/create/meal")
    public String createMeal(
            @RequestBody(required = false) JsonNode input
    ) {
        return stateMachineService.createStateMachine(new InitialMeal(), Optional.ofNullable(input), Optional.empty());
    }

    @PostMapping("/process")
    public String processStateMachine(@RequestParam String instanceId,
            @RequestBody(required = false) JsonNode input) {
        return stateMachineService.processStateMachine(instanceId, Optional.ofNullable(input));
    }
}
Spin Up State Machine Application with Docker
Run the following commands in your terminal.
docker compose build && docker compose up
In another terminal
docker exec -it statemachine-application sh
./mvnw spring-boot:run
You can access the endpoints to create and process state machine using the endpoint https://localhost:8080/swagger-ui/index.html
Debugging
You can query the database using the following terminal command.
docker exec -it mongodb sh
mongosh -u root -p example
use StateMachine
db.States.find({})
db.StateMachineInstance.find({})
Building AI Chat Agent with State?Machine
As a follow up you can read more about Building AI Chat Agent with LLMTool and State Machines.