Create a Todo App Using React's useState Hook and Tackle useState Hell with useReducer
Sanjeev Sharma
SDE II @ Acefone | Ex Tribe | 5? on Fiverr | Typescript | Next.js | Nest.js | Redux
In the realm of modern web development, React has undeniably secured its place as a go-to framework for building dynamic and interactive user interfaces. As React enthusiasts, we understand the significance of crafting robust applications with efficient state management. In this comprehensive guide, we'll embark on a journey to create a Todo app using React's useState hook and, later, explore how to overcome the challenges of managing complex states with the help of useReducer.
Getting Started: Building the Todo App with useState
Setting up Your Environment
Before diving into coding, ensure you have Node.js and npm (Node Package Manager) installed on your system. If not, you can download them from the official website.
Initializing a React App
Let's kickstart our project by creating a new React application. Open your terminal and run the following command:
yarn create vite
Creating the Todo Component
Now that we have our project structure ready, it's time to create our Todo component. We'll break down the application into small, manageable components for better organization.
Inside the "src" folder, locate the "components" directory and create a new file named "Todo.jsx." This will be our main Todo component.
// Todo.jsx
import React, { useState } from 'react';

function Todo() {
  const [todos, setTodos] = useState([]);
  const [newTodo, setNewTodo] = useState('');

  const handleAddTodo = () => {
    if (newTodo) {
      setTodos([...todos, newTodo]);
      setNewTodo('');
    }
  };

  const handleRemoveTodo = (index) => {
    const updatedTodos = todos.filter((_, i) => i !== index);
    setTodos(updatedTodos);
  };

  return (
    <div>
      <h1>Todo App</h1>
      <input
        type="text"
        placeholder="Add a new todo..."
        value={newTodo}
        onChange={(e) => setNewTodo(e.target.value)}
      />
      <button onClick={handleAddTodo}>Add</button>
      <ul>
        {todos.map((todo, index) => (
          <li key={index}>
            {todo}
            <button onClick={() => handleRemoveTodo(index)}>Remove</button>
          </li>
        ))}
      </ul>
    </div>
  );
}

export default Todo;
In this component, we've utilized React's useState hook to manage the state of our Todo app. We maintain an array of todos and a newTodo string, which represents the input for adding new todos.
Implementing the Todo List Component
Now that our core Todo component is ready, let's create a separate component for displaying the list of todos. This modular approach enhances the maintainability of our application.
Inside the "components" directory, create a new file named "TodoList.jsx":
// TodoList.jsx
import React from 'react';

function TodoList({ todos, onRemoveTodo }) {
  return (
    <ul>
      {todos.map((todo, index) => (
        <li key={index}>
          {todo}
          <button onClick={() => onRemoveTodo(index)}>Remove</button>
        </li>
      ))}
    </ul>
  );
}

export default TodoList;
In this component, we receive the list of todos as props and provide a way to remove individual todos. This separation of concerns allows for better code organization.
Integrating Todo and TodoList Components
With our individual components in place, it's time to integrate them into our main application. Open the "src" folder and locate the "App.js" file. We'll modify it to include our Todo and TodoList components.
// App.jsx
import React, { useState } from 'react';
import './App.css';
import Todo from './components/Todo';
import TodoList from './components/TodoList';

function App() {
  const [todos, setTodos] = useState([]);

  const handleAddTodo = (newTodo) => {
    setTodos([...todos, newTodo]);
  };

  const handleRemoveTodo = (index) => {
    const updatedTodos = todos.filter((_, i) => i !== index);
    setTodos(updatedTodos);
  };

  return (
    <div className="App">
      <Todo onAddTodo={handleAddTodo} />
      <TodoList todos={todos} onRemoveTodo={handleRemoveTodo} />
    </div>
  );
}

export default App;
In this modified "App.js" file, we've introduced state management for our Todo app and passed down relevant functions and data as props to the Todo and TodoList components.
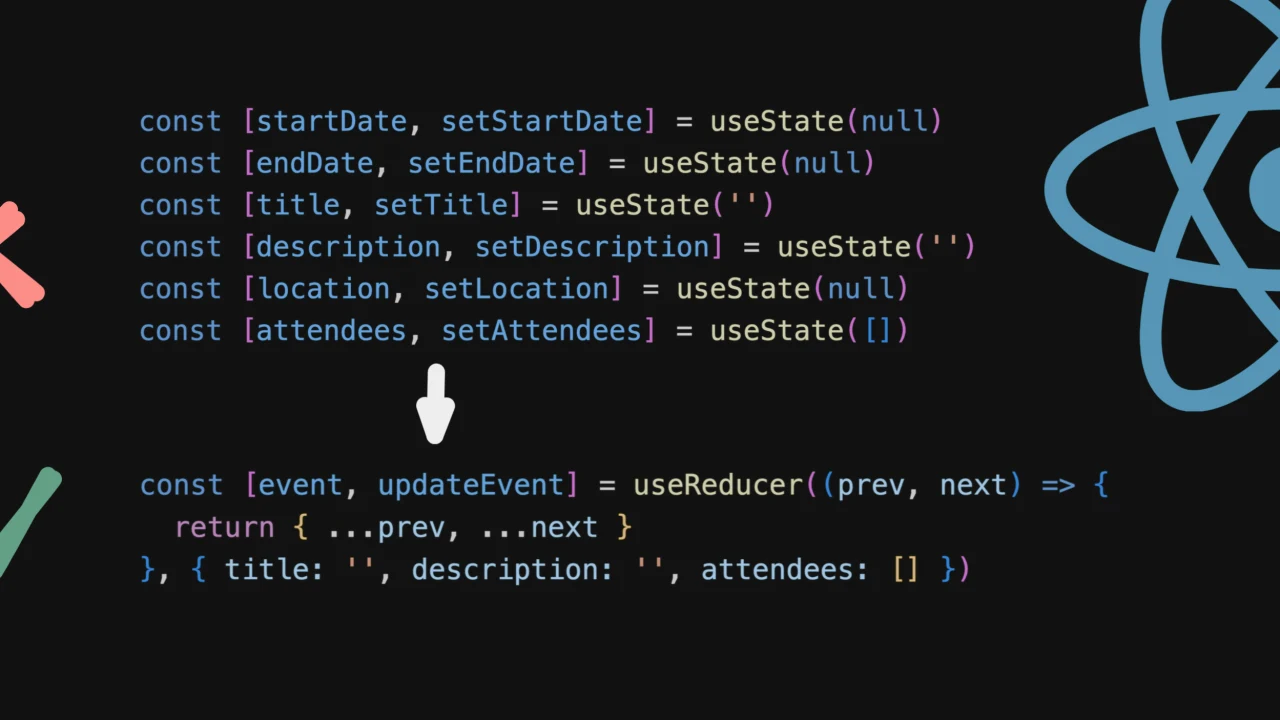
Dealing with useState Hell: Introducing useReducer
While React's useState hook is excellent for managing simple states, it may become challenging to handle complex states as your application grows. This is where useReducer comes to the rescue.
Understanding useReducer
React's useReducer hook is a powerful tool for managing complex state logic in a more structured manner. It operates on the principles of a reducer function and an initial state.
Here's a pattern of how to use useReducer in your React application:
const [state, stateDispachter] = useReducer((prev, next) => ({
	...prev,
	...next,
}), {
  todos: [],
});
Complete Code
// App.jsx

import React, { useReducer } from 'react';
import './App.css';
import Todo from './components/Todo';
import TodoList from './components/TodoList';

function App() {
	const [state, stateDispachter] = useReducer(
		(prev, next) => ({
			...prev,
			...next,
		}),
		{
			todos: [],
		},
	);

	const handleAddTodo = (newTodo) => {
		stateDispachter({ todos: [...state.todos, newTodo] });
	};

	const handleRemoveTodo = (index) => {
		stateDispachter({
			todos: state.todos.filter((_, i) => i !== index),
		});
	};

	return (
		<div className='App'>
<Todo {...{ stateDispachter }} />
<TodoList {...{ state, stateDispachter }} />
		</div>
	);
}

export default App;
Now Updated code of Todo and TodoList component written below:
// TodoList.jsx
import React from 'react';

function TodoList({ state, stateDispatcher }) {

  const handleRemoveTodo = (index) => {
    stateDispatcher({
      todos: state.todos.filter((_, i) => i !== index),
    });
  };

  return (
    <ul>
      {todos.map((todo, index) => (
        <li key={index}>
          {todo}
          <button onClick={() => onRemoveTodo(index)}>Remove</button>
        </li>
      ))}
    </ul>
  );
}

export default TodoList;
领英推荐
// Todo.jsx

function Todo({stateDispatcher}) {

  const handleAddTodo = (newTodo) => {
    stateDispatcher({ todos: [...state.todos, newTodo] });
  };

	return (
		<div>
			<h1>Todo App</h1>
			<input
				type='text'
				placeholder='Add a new todo...'
				value={newTodo}
				onChange={(e) => handleAddTodo(e.target.value)}
			/>
			<button onClick={handleAddTodo}>Add</button>
		</div>
	);
}

export default Todo;
let's organize and rewrite the explanation of why we are using the useReducer hook in the context of the React application:
The Need for useReducer in State Management
In our React application for building a Todo app, we initially utilized the useState hook for managing state. However, as the complexity of our application grew, we encountered situations where the limitations of useState became apparent. This prompted us to introduce the useReducer hook to address these challenges effectively.
The Challenges with useState
The Solution: useReducer
useReducer is a powerful alternative to useState for managing complex states in a more structured manner. It operates based on a reducer function and an initial state, providing a predictable way to manage state transitions.
Here's why we chose to use useReducer:
Implementation in Our Application
In the React application code provided, we are passing the state and stateDispatcher as props from a parent component to child components. This allows child components to access and manipulate the state of the parent component. Here's how it's done:
const [state, stateDispatcher] = useReducer(
  (prev, next) => ({
    ...prev,
    ...next,
  }),
  {
    todos: [],
  },
);
Here, state represents the current state of the application, which includes a todos array among other things, and stateDispatcher is a function that allows us to update this state.
We then pass these values as props to our child components, Todo and TodoList, when rendering them:
<Todo {...{ stateDispatcher }} />
<TodoList {...{ state, stateDispatcher }} />
function Todo({ stateDispatcher }) {
  // ...
}
In this example, stateDispatcher is received as a prop and can be used within the Todo component to update the state of the parent component (App.jsx).
Similarly, in the TodoList.jsx component, we receive both state and stateDispatcher as props:
function TodoList({ state, stateDispatcher }) {
  // ...
}
By passing state and stateDispatcher as props from the parent component to the child components, we establish a communication mechanism that enables child components to interact with and modify the state managed by the parent component. This pattern helps maintain a clean and organized code structure while ensuring efficient state management in a React application.
Conclusion:
In this comprehensive guide, we embarked on a journey to create a Todo app using React, initially leveraging the useState hook for state management and then transitioning to useReducer to tackle more complex state scenarios.
We started by setting up our development environment with Node.js and yarn, then created a new React application using Vite for a quick and efficient setup.
We divided our application into two main components:
Finally, we integrated these components into our main application, passing down relevant functions and data as props.
As we progressed, we discussed the limitations of useState in handling complex states, leading us to introduce useReducer to manage our application's state more effectively. We explained the principles behind useReducer and demonstrated how to implement it in our Todo app.
By following this guide, you've gained valuable insights into building React applications with efficient state management techniques, allowing you to create robust and maintainable user interfaces for your web projects. Happy coding!