Connect to a PostgreSQL Server via SSH Tunnel
Why?
PostgreSQL allows you to connect to remote databases via direct connection, or using SSH tunneling. When you connect via direct connection, you need to open port 5432 of the remote PostgreSQL server as well as its firewall. This is risky because it exposes your remote system to brute-force attacks.
Alternatively, you can connect to the remote PostgreSQL server via SSH port 22, which is already open for remote connections and command executions. Also, all data and connections performed over SSH are encrypted and secure. In this article, we will learn how to connect to a PostgreSQL server via an SSH tunnel.
What is an SSH Tunnel?
SSH tunneling is a method of transporting arbitrary networking data over an encrypted SSH connection. It can be used to add encryption to legacy applications. It can also be used to implement VPNs (Virtual Private Networks) and access intranet services across firewalls.
SSH is a standard for secure remote logins and file transfers over untrusted networks. It also provides a way to secure the data traffic of any given application using port forwarding, basically tunneling any TCP/IP port over SSH. This means that the application data traffic is directed to flow inside an encrypted SSH connection so that it cannot be eavesdropped or intercepted while it is in transit. SSH tunneling enables adding network security to legacy applications that do not natively support encryption.
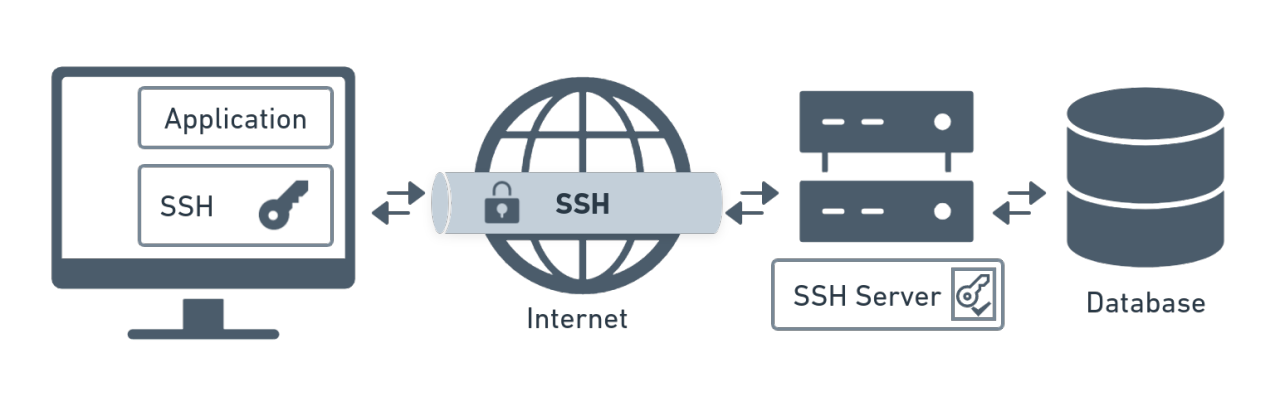
Figure 1.1 presents a simplified overview of SSH tunneling. The secure connection over the untrusted network is established between an SSH client and an SSH server. This SSH connection is encrypted, protects confidentiality and integrity, and authenticates communicating parties.
The SSH connection is used by the application to connect to the application server. With tunneling enabled, the application contacts a port on the local host that the SSH client listens on. The SSH client then forwards the application over its encrypted tunnel to the server. The server then connects to the actual application server - usually on the same machine or in the same data center as the SSH server. The application communication is thus secured, without having to modify the application or end-user workflows.
Put simply, an ssh tunnel is a way to redirect requests to a port on localhost to a remote server.
Creating the Tunnel
Prerequisites
Command
Create SSH connection from local machine to remote PostgreSQL server.
ssh -N -i PRIVATE_KEY USER@SERVER_HOST -L LOCAL_PORT:REMOTE_HOST:REMOTE_PORT
e.g.
领英推荐
ssh -N -i ~/.ssh/id_rsa [email protected] -L 1111:localhost:5432
In the above command,
NOTE: You need to update the database port to the local port number (e.g. 1111) in your .env or application.properties file.
Please note, in case you have a PostgreSQL server running on your machine then you need to use a different local port number (e.g. 1111) in your port forwarding string,?
By default, the above command will run the SSH tunnel in the foreground. If you want to run the tunnel in the background, use the -f option.
By default, SSH runs on port 22. If your SSH server runs on a different port use -p [PORT NUMBER] to specify the actual SSH port number.
Similarly, in your remote PostgreSQL server runs on a port other than the default port 5432, you need to specify it in the local port forwarding string. For example, if your remote PostgreSQL server runs on port 4000, then you need to update the local port forwarding as shown here: -L 1111:localhost:4000
Test the Tunnel
Once the SSH tunnel is established, you can send PostgreSQL commands through it, as if you are issuing them to your local PostgreSQL database. Here is an example.
psql -h localhost -p 1111 -U your-db-username database-name
e.g.
psql -h localhost -p 1111 -U demo_user demo
NOTE: You need to specify the local port number (e.g. 1111) that has been forwarded to the remote PostgreSQL server, using the -p option. Otherwise, PostgreSQL will try to connect to the local PostgreSQL database running on port 1111.
Terminating the Tunnel
You can terminate the SSH tunnel by entering the Ctrl+C keys.