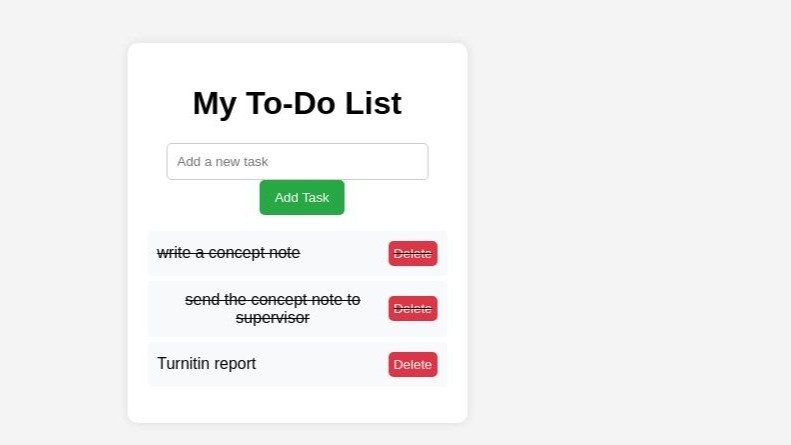
Building a Simple To-Do List App Using JavaScript
Creating a To-Do List is a popular project for beginners learning JavaScript. It introduces key concepts like DOM manipulation, event handling, and conditionals. In this article, we'll break down the important concepts involved in building this basic project, which will help you understand JavaScript fundamentals better.
Project Overview
In this project, we build a To-Do List web app where users can:
Let's walk through the key JavaScript concepts used in this project.
1. Document Object Model (DOM) Manipulation
The Document Object Model (DOM) is a programming interface that represents the structure of an HTML document as a tree of objects. JavaScript can interact with and modify this tree, allowing us to dynamically change the web page without reloading it.
In our project, we use DOM manipulation to:
Key DOM Methods:
const todoInput = document.getElementById('todo-input');
const li = document.createElement('li');
li.innerHTML = `${task} <button class="delete-btn">Delete</button>`;
todoList.appendChild(li);
Here, li is appended to the ul (unordered list) which displays the tasks.
2. Event Handling
Events in JavaScript are actions that happen on the web page, such as clicking a button or typing in a field. We can use JavaScript to listen for these events and run specific code in response.
Key Event Handling Concepts:
addButton.addEventListener('click', addTask);
This listens for the user to click the "Add Task" button, and then calls the addTask() function.
领英推荐
li.querySelector('.delete-btn').addEventListener('click', function (e) {
    e.stopPropagation();
    li.remove();
});
3. Conditionals
Conditionals allow us to make decisions in our code based on whether certain conditions are true or false. In this project, we check if the user has entered text before adding a task:
const task = todoInput.value.trim();  // Remove extra spaces
if (task === "") {
    alert('Please enter a task!');
    return;
}
Here, if checks whether the input is empty. If the condition (task === "") is true, we show an alert message and prevent the task from being added by using return to exit the function early.
4. Toggling Classes (CSS)
The classList property allows us to manipulate the classes applied to an HTML element. In our project, we toggle the class for a completed task:
li.addEventListener('click', function () {
    li.classList.toggle('completed');
});
5. Basic Styling with CSS
In this project, we also use CSS to style the elements and provide visual feedback to the user. While the focus is on JavaScript, styling the app makes it more user-friendly. For instance, we style the completed tasks with a line-through using the .completed class:
.completed {
    text-decoration: line-through;
}
6. Clearing Input Fields
After the user adds a new task, we clear the input field so it's ready for a new task. This is done by setting the input field's value to an empty string:
todoInput.value = "";
7. Reusability with Functions
To keep our code organized, we encapsulate logic in reusable functions. For example, the task-adding functionality is wrapped in a function called addTask():
function addTask() {
    const task = todoInput.value.trim();
    if (task === "") {
        alert('Please enter a task!');
        return;
    }

    // Create new list item and delete button
    const li = document.createElement('li');
    li.innerHTML = `${task} <button class="delete-btn">Delete</button>`;

    // Toggle task completion on click
    li.addEventListener('click', function () {
        li.classList.toggle('completed');
    });

    // Delete task on button click
    li.querySelector('.delete-btn').addEventListener('click', function (e) {
        e.stopPropagation();
        li.remove();
    });

    // Add the task to the list
    todoList.appendChild(li);

    // Clear input field
    todoInput.value = "";
}
Conclusion
This simple To-Do List project helps you grasp several key concepts in JavaScript, such as:
By working through this project, you get hands-on experience with these core JavaScript concepts, laying the foundation for more advanced web development projects.
Data Support Executive at Safaricom Limited
2 周Very informative piece.
Machine Learning Engineer | Web Developer
2 周Love this