Azure Marketplace without filter - Procurement Best Practices!
This article is part of my "Azure Marketplace without filter" series, which now includes one video and three articles.
First, you can watch this video "Azure Marketplace without filter" to see the end-to-end process and user experience for both a publisher/ISV and customer.
Second, the article Azure Marketplace - Start Simple but Start Now will focus on the HOW part, illustrating how to create Public and Private offers for a single Publisher.
Third, the article "Setup for ISVs with a Global Scope" will demonstrate how to set up multiple publishers in Partner Center for an ISV with a global scope.
Fourth, this article will describe how a customer can have full control of all purchases on Azure Marketplace and implement a cost allocation process.
Customers like Azure Marketplace but ...
I have had almost 100 Azure Marketplace meetings with customers over the last year and everyone see the value in Azure Marketplace.
Customers want to simplify and standardize their ISV procurement process and to be able to use Marketplace purchases to decrement their Microsoft Azure Customer Agreement (MACC) commitment.
... but Procurement wants Control
However, it is a unambiguous requirement from all procurement people, I have met, that they must be able to control the purchasing process at least as good as today, including both the approval and cost allocation process.
... and I fully understand, it makes total sense!
By default only users with subscription owner or contributor permissions are allowed to make a purchase on Azure Marketplace, but this is not sufficient for procurement. (See more about Role Based Access Control or RBAC here).
Procurement wants to approve any purchase on Azure Marketplace, even "free" or trial versions, as reality is that "free" offers often (always) will have a cost over time and hence should be part of the approval process.
Private Marketplace is THE solution!
In this article, I will demonstrate how simple it is to achieve full control and transparency by enabling the Private Marketplace in your Azure Portal.
You will also see how you can set up a simple cost allocation - or FinOps - process, similar to what you have for any other Azure services.
Below you will find the summary of all recommendations in this article ...
Enable and Configure Private Marketplace
Extend your current processes to support Azure Marketplace
Best Practices for people who want to buy on Marketplace
Best Practices for Marketplace Admins
The rest of the article is just (a lot of) details
The initial step: Enable Private Marketplace
Why?
By enabling Private Marketplace in Azure, nobody in your organization will be able to subscribe to any non-Microsoft offer on Azure Marketplace unless it has been approved by a Marketplace Admin, a user who has been assigned the Marketplace admin role.
In other words, any offer will have to be approved (or "whitelisted") before anyone can buy anything on Azure Marketplace.
... and initially nothing is whitelisted ...
How?
You enable Private Marketplace in two simple steps
You can see details below or in this comprehensive documentation.
Find existing Marketplace dependencies - and do a Scream Test
If possible, you should identify all existing Azure Marketplace dependencies in your organization, for example if a DevOps process is using a Marketplace image.
You will then have to decide whether you want to approve this approach and if yes, "whitelist" these solutions in Private Marketplace.
In reality, you will likely have to do a "Scream Test" to find them all - and you should obviously plan this carefully.
You may have projects that will break when you enable Private Marketplace as this will block use of all non-approved Azure Marketplace solutions.
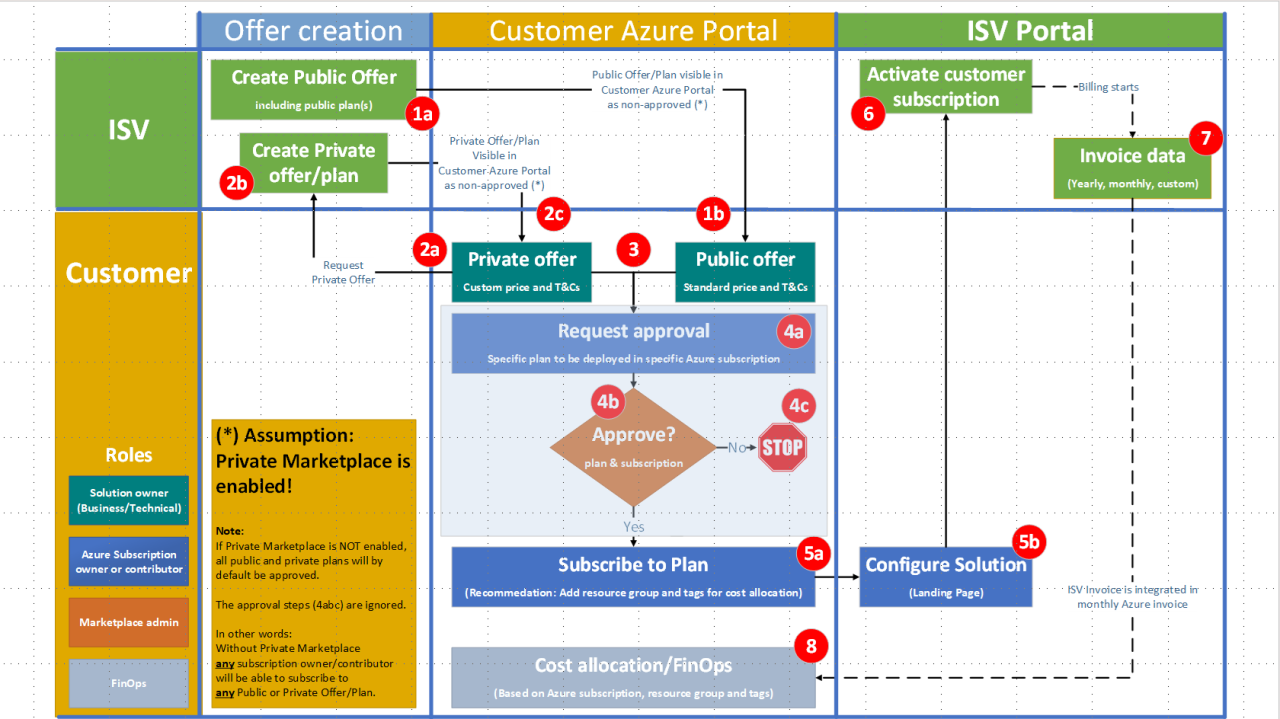
The Purchasing Process - the Overview
The picture above shows all steps needed in the purchasing process when Private Marketplace is enabled. All steps are described below ...
Note:
If Private Marketplace is NOT enabled, all public and private plans will by default be approved and the approval steps (4abc) are ignored.
In other words: Without Private Marketplace any subscription owner/contributor will be able to subscribe to any Public or Private Offer/Plan.
Last, but not least: If the solution, you are interested in, is not yet transactable on Azure Marketplace, suggest the ISV to make it transactable using this guidance.
This section should only be seen as examples for inspiration and will have to customized to fit the requirements in your organization.
I also recommend to check the many links provided in the "Additional Resources" section below.
Define Marketplace Admin's
If you, as recommended, decide to enable Private Marketplace, you will need to assign the Marketplace Admin to at least one user.
Below you will see the relevant screens to do this.
Enable Private Marketplace (only done once!)
The Collection setup in Private Marketplace
Private Marketplace contains one or more "Collections" of approved offers/plans.
I recommend at least three collections as described below
The Default Collection
The "Default Collection" is "built-in" and can not be deleted or customized.
Note that an approved plan/offer in the "Default Collection" is approved for all current and future subscriptions.
In other words, all offers/plans in the "Default Collection" can be deployed by all subscription owners/contributors without an approval process.
As a consequence it is recommended only to use the Default Collection to a minimum set of pre-approved/whitelisted solutions that you will allow everyone to be able to deploy in their subscriptions, for example freeware, trials or VM with BYOL (Bring Your Own License; e.g. with no cost on Azure Marketplace).
See below in the "Details" section how you add an offer/plan to the Default Collection.
领英推荐
The "Public Offers" collection
I recommended to create one collection to contain approved plans for ongoing Azure Marketplace transactions and the assigned subscription should match the requirement in the actual transaction.
Note:
The "Private Offers/plans" collection
This collection is defined with a "Rule", enabling support for Private offers/plans - see picture below. Everything else is exactly like with Public offers above.
Add a solution to the Default collection
Note: As mentioned earlier it is recommended to minimize pre-approved solutions, especially in the Default Collection.
Below you see how you can open the Default Collection (1), press the "Add selected Items" button, find the "Twilio SendGrid" and add the "Free 100" public plan to the Default collection.
Now all subscription owners/contributors will be preapproved to add this specific "Free 100" plan to their subscriptions.
Note: "Free" plans are almost never free
As discussed earlier, most "free" plans will have a cost or commitment element - and so does this Twilio SendGrid plan as it has an overage cost if you send more than 100 mails per day.
Be Specific - in Request and in Approval
Marketplace Admins should require that solution owners are specific when they ask for approval of a new purchase on Azure Marketplace.
The Marketplace admin should then
Note: The steps above are to get the approval to purchase the solution, not to do the actual purchase.
Below you will see all steps needed to get approval and purchase a non-approved public offer/plan.
Subscribe to a Public Offer/plan
In this section, you will see the steps needed to purchase a non-approved public offer/plan (here Templafy for M365 and the plan Templafy for Brand Activation) to be assigned to the subscription named "Pay-As-You-Go".
This will include three steps ...
Step 1: Approval to subscribe to the specific plan
The solution owner will first need to request approval as per Step 1-3 above when everything is ready to transact. This could include a formal approval from the standard procurement process and with a PO number as output.
The Marketplace Admin will then approve the request by adding the specific plan to the "Public Offers" collection and change the approved subscriptions to "Pay-As-You-Go" only.
Finally, when the transaction is done, the Marketplace Admin should delete the plan from the "Public Offers" collection.
Step 2: Configuration of the approved plan
When the specified plan has been approved for deployment in the specified subscription, the subscription owner/contributor will be able to "Subscribe" to the plan in the Azure Portal.
The solution owner should now add resource group and tags as per guidelines.
After pressing the "Subscribe" button, the only step missing is configure the account in the ISV portal and formally accept the subscription.
Pressing the "Configure account now" button will open the ISV Landing Page.
Step 3: Accept subscription of solution
The last and final step is to press the "Subscribe" which will finalize the purchase.
Note: The ISV will now ...
Subscribe to a Private Offer/plan
The vast majority of transactions on Azure Marketplace are "Private Offers/plans" with custom pricing and T&Cs.
Many ISVs even have created Public Offers with one or more public plans with a price of ZERO and with a description asking people to reach out to kickstart a Private Offer discussion - see the example below for Cognite.
Note:
Minimize Whitelisting and make it "JIT"
To maximize control, it is recommended to ...
Want to hear more, have feedback/suggestions or need help?
As always, I am very interested on your feedback. Please feel free to add a comment to this article, reach out to me ([email protected]).
Last, but not least: If you are a customer that wants to buy an Azure SaaS solution on Azure Marketplace and you need?any?help, reach out to your Microsoft contact - or to me ([email protected]).
Great stuff, thank you for sharing!
Corporate, Digital & IT Strategy Lead I Business Development & Partnerships I Advisor I MBA
1 年Alvaro Perez Alexey Kinebas might be of interest
Guy Schuchman FYI
Director Global Partner Solutions & Innovation at Microsoft
1 年Brilliant and thank you for sharing Anders Bonde and for strong collaboration with Johan ?sberg
Sr. Strategic Partnership Manager @Microsoft | Ecosystem Builder | Innovation Catalyst | ISV & Startup Growth Accelerator
1 年Amazing! Thank you Anders Bonde I’ll share right away with my network! ??