Automate your REST API Testing using vREST
Dheeraj Kumar Aggarwal
Helping businesses solve API and Traceability problems | Product Evangelist | Atlassian Expert | API Automation Expert | Creator of vREST NG
Hi everyone, let me introduce you vREST. vREST is an online tool which will help you to automate your REST API Testing. With vREST, you can start writing your test cases with in minutes. I think, everyone knows the benefits of automated REST API Testing. So, I will not spent time on counting benefits of automated testing.
vREST is a simple and intuitive tool and provides you a powerful UI to automate your testing.
In vREST, a group of HTTP requests can be organised to be executed in sequence. Each HTTP request is represented as a test case in vREST and each test case can be validated with the help of response validators. Now, we will walk through step by step, how we can validate a single API (test case) in vREST.
Suppose I have the following API which creates a resource on server:
- API URL: https://vrest.io/i/demo/m/RVD/create_resource
- Method: PUT
- Request Parameters
{
"resource_name": "<String>",
"resource_url": "<URI>",
"description": "<String>"
} - Request Headers
{
"Content-Type": "application/json"
} - Expected Response
{
"id": "<SHA_HASH>",
"resource_name": "<String>",
"resource_url": "<URI>",
"resource_description": "<String>",
"created_at": "<Date>"
}
Let us see step by step, how you can validate this API in vREST. I am assuming that the above API doesn't need any authorization/authentication, but you can configure that easily in vREST.
- Create a test case in vREST
A test case can be created by simply clicking on “New” button in the “Test Cases” tab. A popup will appear as shown below and fill in the basic details to create a new test case.
After clicking on save button, a test case will be created something like as shown below. Click on the test case to expand it to provide further details:
- Define Request Parameters
After creating the test case, you can define API's request parameters in "Request" tab.
- Define Request Headers
Now you can define your request headers in "Request" tab > "Headers" sub-tab.
- Response Validation
Response Validators helps to validate test cases. vREST provides two built-in response validators:
a) Default Validator validates the expected and actual responses (response body) for exact match. If the value doesn't match, it simply fails the test case. We need to define Expected Body, if we choose this.
b) Default Schema Validator validates the schema of actual response instead of checking for exact content match. We need to define Expected Schema, if we choose this.
Note: You can also define custom validators for customized validation.
In our example, we have used "Default Validator" while creating the test case in step 1. So we need to define the expected body. There are two ways to define expected body:
a) Define the expected body manually as shown below
Note: "{{*}}" is a special variable which replaces itself with the actual value before sending the expected body to Default Validator for response validation. In simple words, you can use it to ignore property values in JSON responses for response validation. As in our above API, id and created_at field is dynamic, so we can ignore it with "{{*}}".
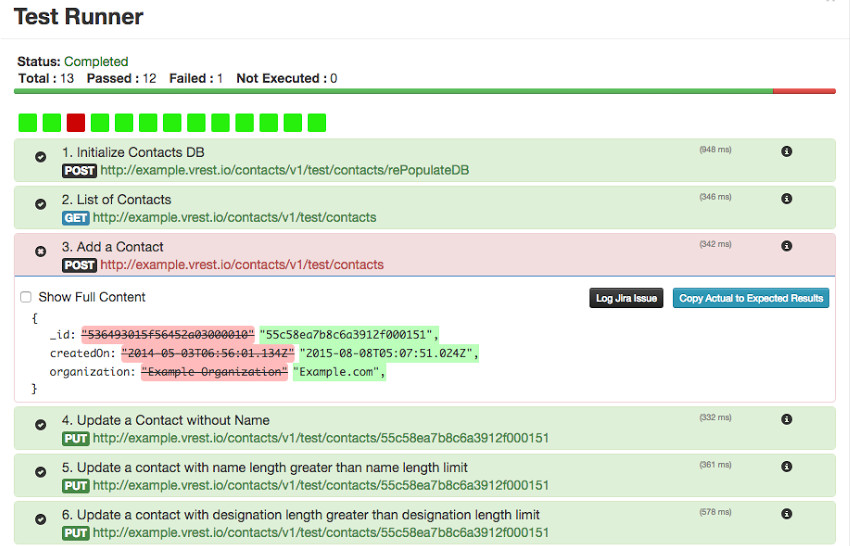
b) Execute the test case without defining the expected body, test case will fail because expected body (blank) will not match with actual body. In test runner modal window, vREST will provide an option "Copy Actual to Expected Results". And clicking on this button, system will copy the results for you. Later on, you can modify your expected body according to your needs. - Execute Test Case
To execute this test case, simply select the test case and click on "Run 1 testcase" button. A modal window will appear and will provide you information regarding the test case execution.
In case, if you haven't provided the expected body in previous step, test case will fail like as shown in figure below. It is saying that your expected body should look like this in green color.


That's it. In this manner, you can create a suite of positive and negative test cases in a very few time. Your test suite might look like:

I have just demonstrated the manual way of creating test cases in vREST in the whole process mentioned above. However you can automate the creation process also via recording the test case through our Google Chrome Extension. I will cover that in later posts. So, give vREST a try and stay tuned.